狂神说_Docker教程
本文最后更新于:2023年7月31日 中午
前言
Docker学习
- Docker概述
- Docker安装
- Docker命令
- 镜像命令
- 容器命令
- 操作命令
- ……
- Docker镜像!
- 容器数据卷
- DockerFile
- Docker网络原理
- IDEA整合Docker
- CI/CD
- Kubernetes
Docker概述
Docker为什么会出现
debug…..
传统虚拟机与容器化技术的对比
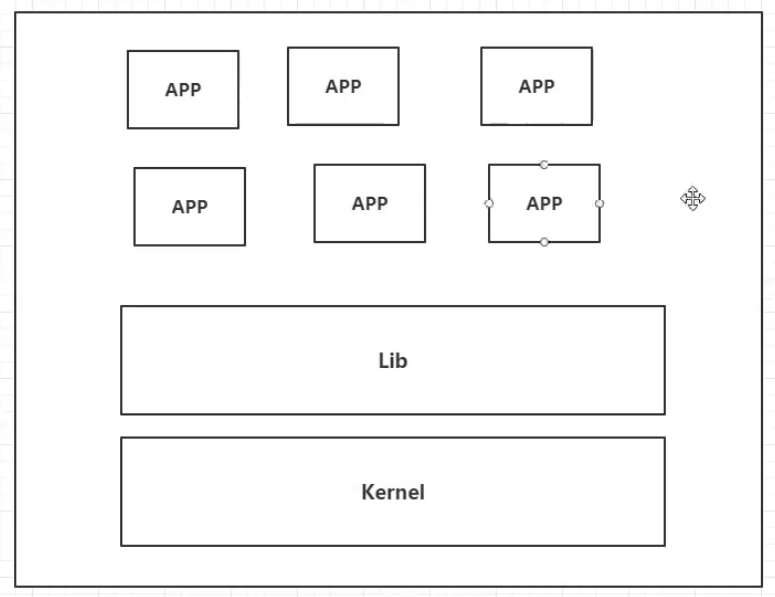
传统虚拟机的方式
缺点:
- 资源占用十分多
- 冗余步骤多
- 启动慢
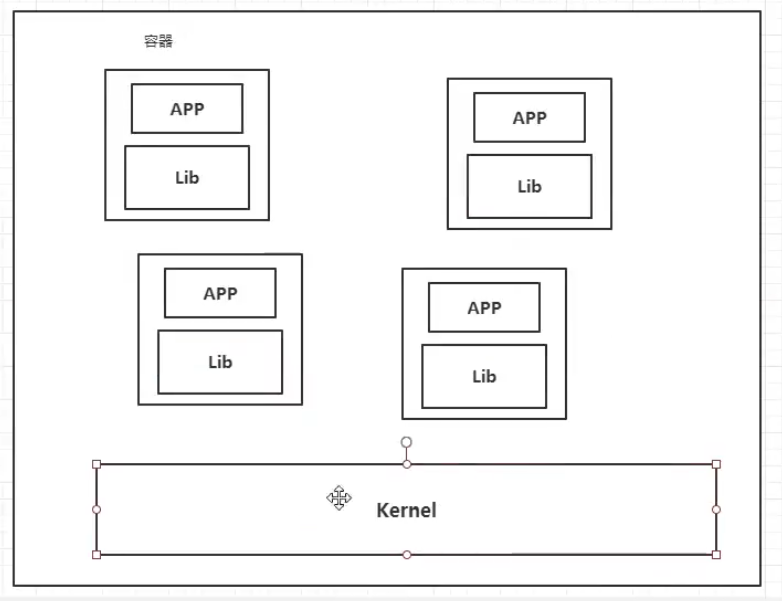
容器化技术
比较Docker 和 虚拟机技术的不同 :
- 传统虚拟机虚拟出一条硬件,运行一个完整的操作系统,然后在这个系统上安装和运行软件
- 容器内的应用直接运行在宿主机的内容,容器是没有自己的内核的,也没有虚拟我们的硬件,所以就轻便了。
- 每个容器间是互相隔离,每个容器内都有一个属于自己的文件系统,互不影响。
Docker的历史
2010年,几个搞IT的年轻人,就在美国成立了一家公司dotcloud
做一些 pass 的云计算服务! LXC 有关的容器技术!
他们将自己的技术(容器化技术) 命名 就是 Docker !
Docker 刚刚诞生的时候,没有引起行业的注意! dotCloud,就活不下去!
开源
开发源代码!
2013年,Docker开源!
Docker越来越多的人发现了docker的优点!火了,Docker 每个月都会更新一个版本!
2014年4月9日,Docker1.0发布!
Docker为什么这么火?十分的轻巧!
在容器技术出来之前,我们都是使用虚拟机技术!
虚拟机:在window中装一个Vmware,通过这个软件我们可以虚拟出来一台或者多台电脑!笨重!
虚拟机也是属于虚拟化技术,Docker容器技术,也是一种虚拟化技术!
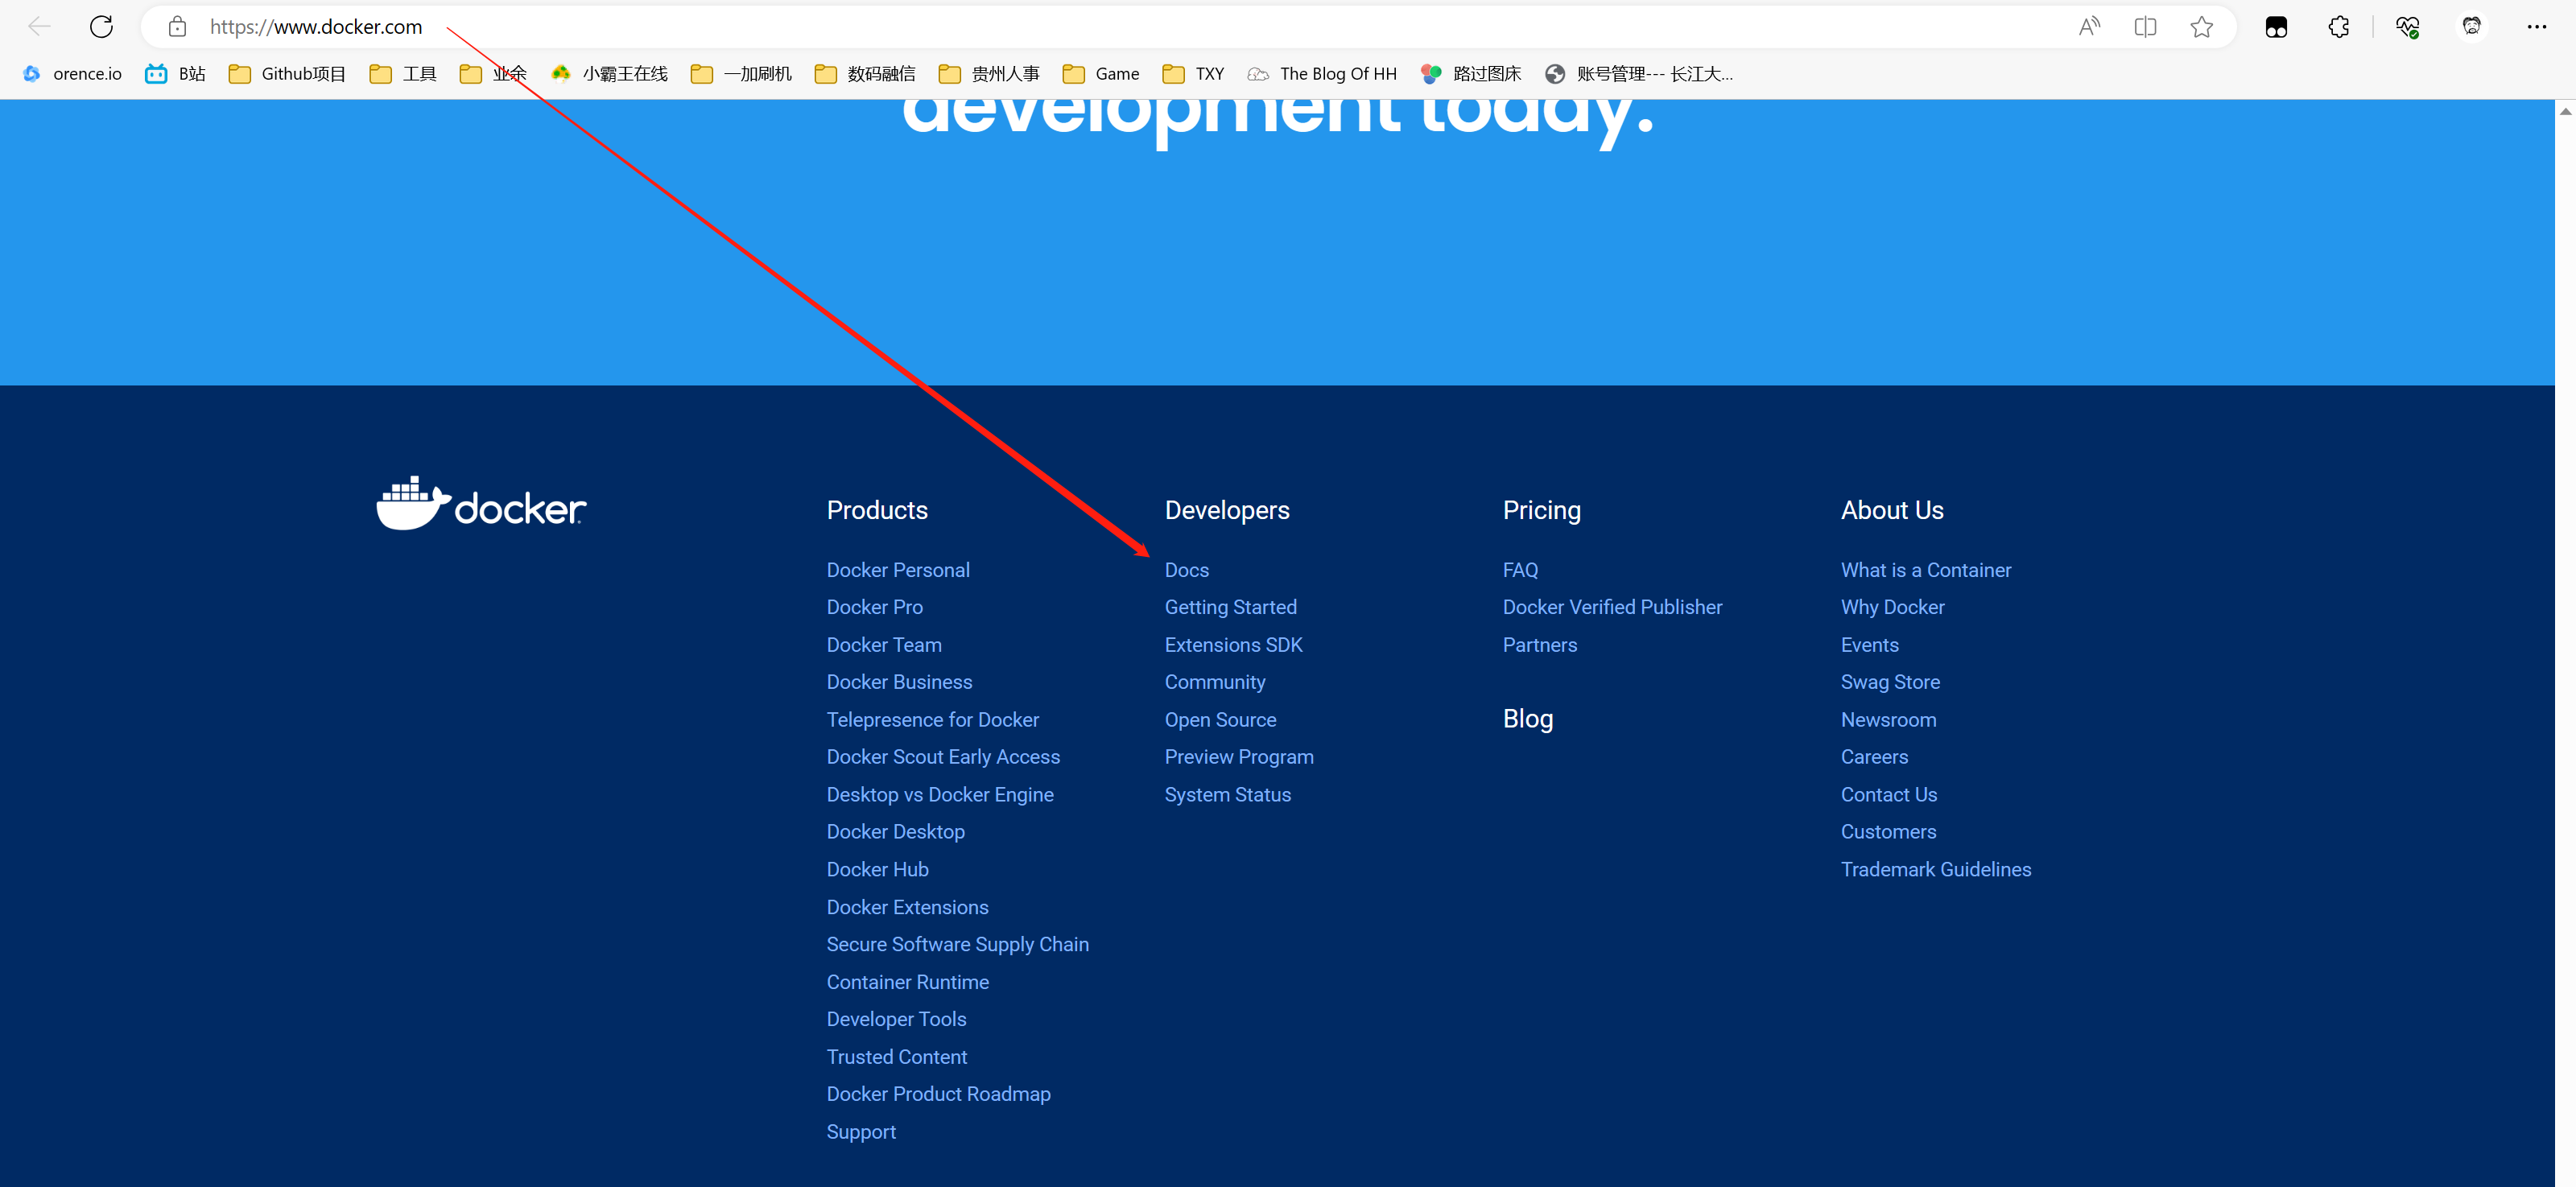
Docker官网
Docker基于Go语言开发的开源项目
官网:Docker官网
文档地址:Docker官方文档
仓库文档地址:Docker Hub
Docker的基本组成
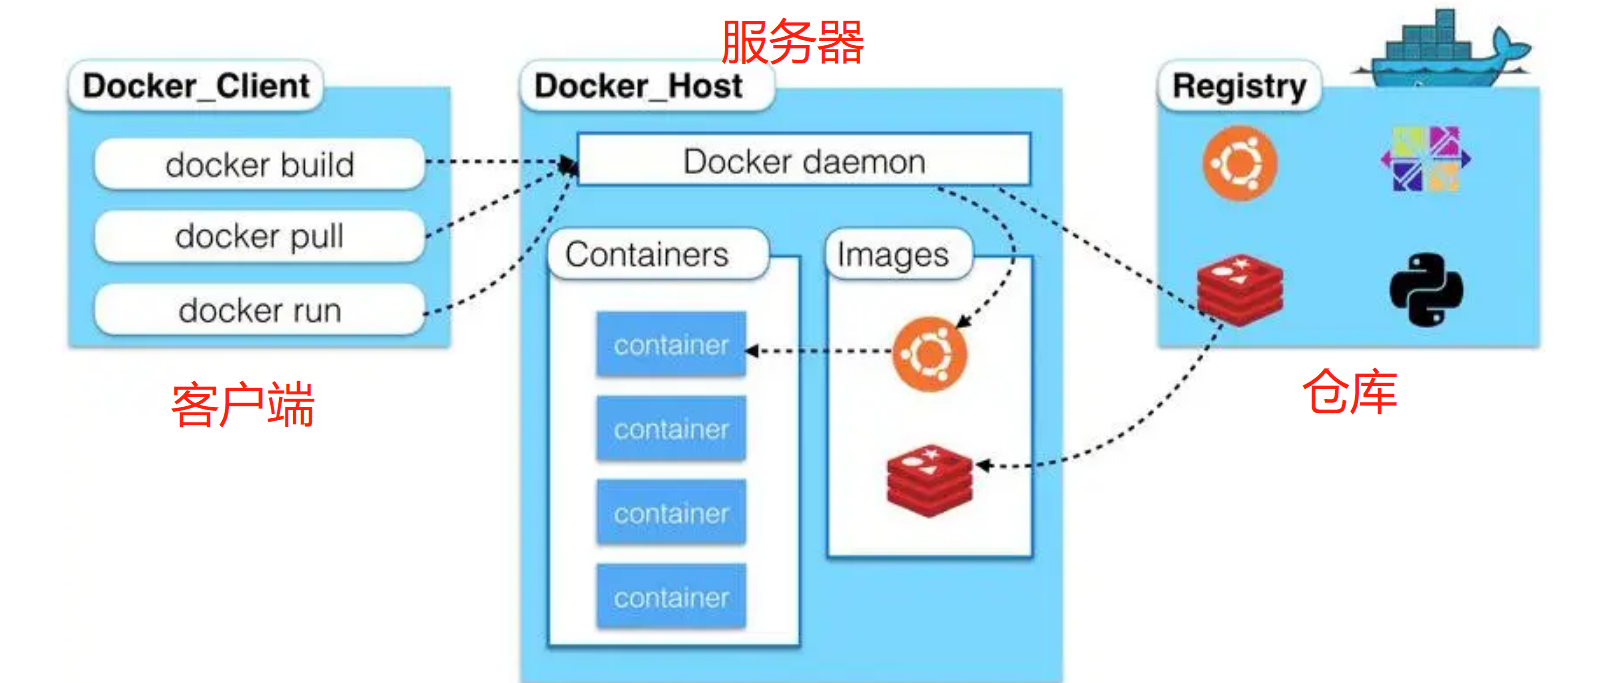
Docker名词解释
镜像(Image)
docker镜像就好比是一个模板,可以通过这个模板来创建容器服务,tomcat镜像==> run => tomcat
容器(Container)
Docker利用容器技术,独立运行一个或者一个组应用,通过镜像来创建的。
启动,停止,删除,基本命令!
目前就可以把这个容器理解为就是一个简易的linux系统
仓库(Repository)
仓库就是存放镜像的地方。仓库分为
公有仓库和私有仓库
Docker Hub(默认是国外的)
阿里云….都有容器服务器(配置镜像加速!)
Docker安装
安装Docker
环境
# 系统内核需要 3.10 以上
[root@VM-0-5-centos ~]# uname -r
3.10.0-1160.88.1.el7.x86_64

# 系统版本
[root@VM-0-5-centos ~]# cat  /etc/os-release
NAME="CentOS Linux"
VERSION="7 (Core)"
ID="centos"
ID_LIKE="rhel fedora"
VERSION_ID="7"
PRETTY_NAME="CentOS Linux 7 (Core)"
ANSI_COLOR="0;31"
CPE_NAME="cpe:/o:centos:centos:7"
HOME_URL="https://www.centos.org/"
BUG_REPORT_URL="https://bugs.centos.org/"

CENTOS_MANTISBT_PROJECT="CentOS-7"
CENTOS_MANTISBT_PROJECT_VERSION="7"
REDHAT_SUPPORT_PRODUCT="centos"
REDHAT_SUPPORT_PRODUCT_VERSION="7"

[root@VM-0-5-centos ~]#
安装
文档地址:[Install Docker Engine on CentOS](Install Docker Engine on CentOS | Docker Documentation)
卸载旧版本的Docker
# 卸载旧版本的Docker
[root@VM-0-5-centos ~]# sudo yum remove docker \
>                   docker-client \
>                   docker-client-latest \
>                   docker-common \
>                   docker-latest \
>                   docker-latest-logrotate \
>                   docker-logrotate \
>                   docker-engine
Repository epel is listed more than once in the configuration
No Match for argument: docker
No Match for argument: docker-client
No Match for argument: docker-client-latest
No Match for argument: docker-common
No Match for argument: docker-latest
No Match for argument: docker-latest-logrotate
No Match for argument: docker-logrotate
No Match for argument: docker-engine
No Packages marked for removal
安装需要的安装包
# 安装需要的安装包
[root@VM-0-5-centos ~]# yum install -y yum-utils
设置镜像源,一般不选择默认的Docker官方镜像源,速度比较慢,设置为阿里云的镜像源
# 设置【官方】镜像源
[root@VM-0-5-centos ~]# yum-config-manager --add-repo https://download.docker.com/linux/centos/docker-ce.repo

# 设置【阿里云】镜像源
[root@VM-0-5-centos ~]# yum-config-manager --add-repo http://mirrors.aliyun.com/docker-ce/linux/centos/docker-ce.repo
更新软件包索引
# 更新软件包索引
[root@VM-0-5-centos ~]# yum makecache fast
安装docker docker-ce docker-ce-cli containerd.io
# 安装
[root@VM-0-5-centos ~]# yum install docker-ce docker-ce-cli containerd.io
查看版本,检测是否安装成功
[root@VM-0-5-centos ~]# docker version
Client: Docker Engine - Community
 Version:           24.0.4
 API version:       1.43
 Go version:        go1.20.5
 Git commit:        3713ee1
 Built:             Fri Jul  7 14:54:21 2023
 OS/Arch:           linux/amd64
 Context:           default

Server: Docker Engine - Community
 Engine:
  Version:          24.0.4
  API version:      1.43 (minimum version 1.12)
  Go version:       go1.20.5
  Git commit:       4ffc614
  Built:            Fri Jul  7 14:53:26 2023
  OS/Arch:          linux/amd64
  Experimental:     false
 containerd:
  Version:          1.6.21
  GitCommit:        3dce8eb055cbb6872793272b4f20ed16117344f8
 runc:
  Version:          1.1.7
  GitCommit:        v1.1.7-0-g860f061
 docker-init:
  Version:          0.19.0
  GitCommit:        de40ad0
启动docker
[root@VM-0-5-centos ~]# systemctl start docker运行
hello-world[root@VM-0-5-centos ~]# docker run hello-worldUnable to find image ‘hello-world:latest’ locally
latest: Pulling from library/hello-world
719385e32844: Pull complete
Digest: sha256:926fac19d22aa2d60f1a276b66a20eb765fbeea2db5dbdaafeb456ad8ce81598
Status: Downloaded newer image for hello-world:latestHello from Docker!
……
大概流程:
st=>start: 开始
run=>operation: docker run hello-world
  >cond1=>condition: 本地镜像库中是否存在此镜像?
noExistAtLocal=>operation: 访问远程仓库
cond2=>condition: DockeHub中否存在?
  >ExistInOrign=>operation: 拉取DockeHub中的镜像到本地仓库
error=>operation: 报错
app=>operation: 运行
  >e=>end: 结束

st(right)->run(right)->cond1->cond2>e
  >cond1(yes,right)->app->e
 cond1(no)->noExistAtLocal->cond2
  >cond2(yes)->ExistInOrign->app->e
cond2(no)->error->e
查看下载的镜像
# 查看下载的镜像
[root@VM-0-5-centos ~]# docker images
REPOSITORY    TAG       IMAGE ID       CREATED        SIZE
hello-world   latest    9c7a54a9a43c   2 months ago   13.3kB
卸载Docker
卸载依赖
# 卸载依赖
[root@VM-0-5-centos ~]# yum remove docker-ce docker-ce-cli containerd.io
删除容器
# 删除容器
[root@VM-0-5-centos ~]# rm -rf /var/lib/containerd
删除默认工作目录
# 删除默认工作目录
[root@VM-0-5-centos ~]# rm -rf /var/lib/docker
配置阿里云镜像加速
进入阿里云官网,登录进入控制台
搜索
容器镜像服务选择镜像加速器/CentOS
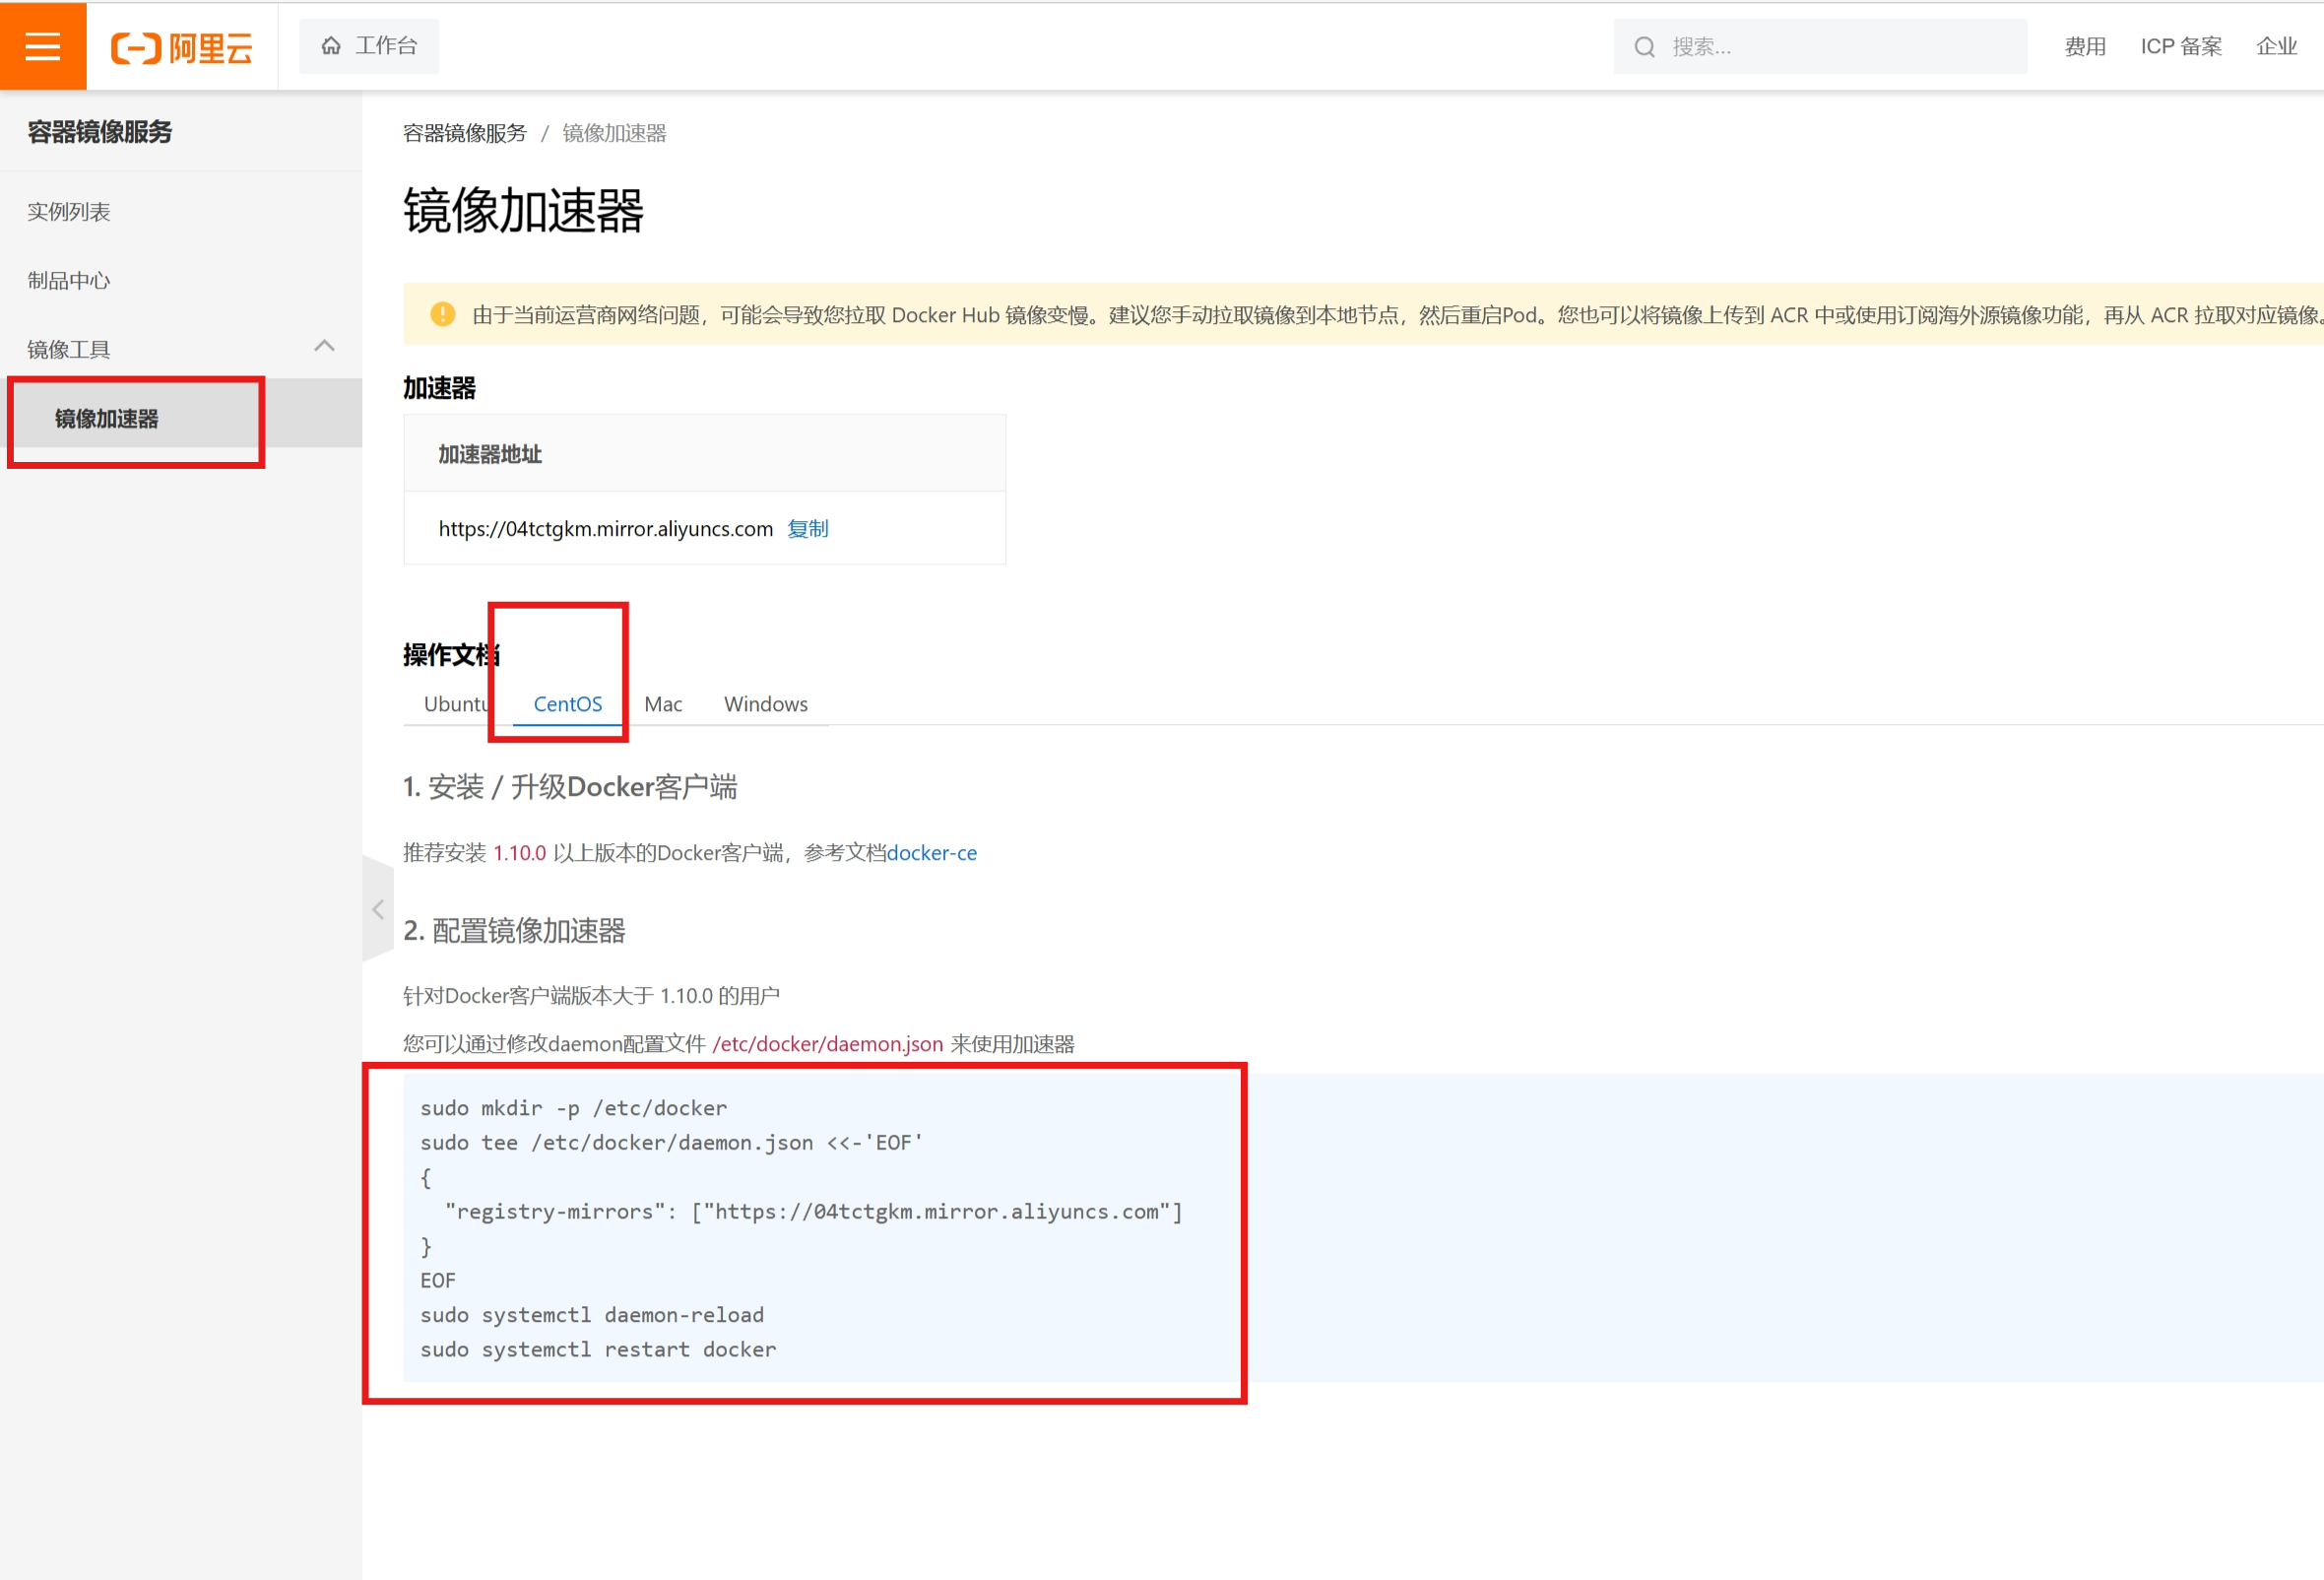
配置到服务器上
# 创建文件夹
[root@VM-0-5-centos ~]# mkdir -p /etc/docker

# 编写daemon.json脚本
[root@VM-0-5-centos ~]# tee /etc/docker/daemon.json <<-'EOF'
{
  "registry-mirrors": ["https://04tctgkm.mirror.aliyuncs.com"]
}
EOF

# 加载新的unit配置文件
[root@VM-0-5-centos ~]# systemctl daemon-reload

# 重启docker
[root@VM-0-5-centos ~]# systemctl restart docker
Docker常用命令
Docker帮助命令
docker version			# 显示docker版本信息
docker info				# 显示docker系统信息,包括镜像和容器的数量
docker 命令 --help 	   # 帮助命令
Docker镜像命令
docker images查看本机镜像[root@VM-0-5-centos ~]# docker images REPOSITORY TAG IMAGE ID CREATED SIZE hello-world latest 9c7a54a9a43c 2 months ago 13.3kBREPOSITORY 镜像仓库源
TAG 镜像标签
IMAGE ID 镜像ID
CREATED 镜像创建时间
SIZE 镜像大小
可选项
- a, –all # 列出所有
- q, –quiet # 只显示镜像ID
docker search 镜像名搜索镜像[root@VM-0-5-centos ~]# docker search mysql NAME DESCRIPTION STARS OFFICIAL AUTOMATED mysql MySQL is a widely used, open-source relation… 14321 [OK] mariadb MariaDB Server is a high performing open sou… 5467 [OK] percona Percona Server is a fork of the MySQL relati… 617 [OK] phpmyadmin phpMyAdmin - A web interface for MySQL and M… 836 [OK]可选项
–filter=stars=5000 # 根据star数量 大于等于5000的 进行过滤
[root@VM-0-5-centos ~]# docker search mysql --filter=stars=5000
NAME      DESCRIPTION                                     STARS     OFFICIAL   AUTOMATED
mysql     MySQL is a widely used, open-source relation…   14328     [OK]
mariadb   MariaDB Server is a high performing open sou…   5469      [OK]
dcoker pull 镜像名下载镜像[root@VM-0-5-centos ~]# docker pull mysql Using default tag: latest # 不指定版本,默认下载最新版本 latest: Pulling from library/mysql 72a69066d2fe: Pull complete # 分层下载,docker images的核心 联合文件系统 93619dbc5b36: Pull complete 99da31dd6142: Pull complete 626033c43d70: Pull complete 37d5d7efb64e: Pull complete ac563158d721: Pull complete d2ba16033dad: Pull complete 688ba7d5c01a: Pull complete 00e060b6d11d: Pull complete 1c04857f594f: Pull complete 4d7cfa90e6ea: Pull complete e0431212d27d: Pull complete Digest: sha256:e9027fe4d91c0153429607251656806cc784e914937271037f7738bd5b8e7709 # 签名 Status: Downloaded newer image for mysql:latest docker.io/library/mysql:latest # 真实地址默认下载是最新版本,可以使用
docker pull xxx:[tag]来下载指定的版本,如下载mysql5.7的版本[root@VM-0-5-centos ~]# docker pull mysql:5.7 5.7: Pulling from library/mysql 72a69066d2fe: Already exists # 已经存在是因为上面已经下载过一些文件,直接跳过,极大的较少了内存和时间的占用 93619dbc5b36: Already exists 99da31dd6142: Already exists 626033c43d70: Already exists 37d5d7efb64e: Already exists ac563158d721: Already exists d2ba16033dad: Already exists 0ceb82207cd7: Pull complete 37f2405cae96: Pull complete e2482e017e53: Pull complete 70deed891d42: Pull complete Digest: sha256:f2ad209efe9c67104167fc609cca6973c8422939491c9345270175a300419f94 Status: Downloaded newer image for mysql:5.7 docker.io/library/mysql:5.7 # docker pull mysql:5.7 等价于 docker pull docker.io/library/mysql:5.7[root@VM-0-5-centos ~]# docker images REPOSITORY TAG IMAGE ID CREATED SIZE mysql 5.7 c20987f18b13 19 months ago 448MB mysql latest 3218b38490ce 19 months ago 516MBdocker rmi 镜像ID1 镜像ID2删除镜像,可以删除单个或多个[root@VM-0-5-centos ~]# docker rmi c20987f18b13 Untagged: mysql:5.7 Untagged: mysql@sha256:f2ad209efe9c67104167fc609cca6973c8422939491c9345270175a300419f94 Deleted: sha256:c20987f18b130f9d144c9828df630417e2a9523148930dc3963e9d0dab302a76 Deleted: sha256:6567396b065ee734fb2dbb80c8923324a778426dfd01969f091f1ab2d52c7989 Deleted: sha256:0910f12649d514b471f1583a16f672ab67e3d29d9833a15dc2df50dd5536e40f Deleted: sha256:6682af2fb40555c448b84711c7302d0f86fc716bbe9c7dc7dbd739ef9d757150 Deleted: sha256:5c062c3ac20f576d24454e74781511a5f96739f289edaadf2de934d06e910b92docker rmi $(docker images -aq)删除所有镜像注意:镜像ID只要能唯一标识一个镜像就行,可以不用显示出来的全部
Docker容器命令
说明:使用容器命令的前提是要有镜像存在!!!为了学习,下载一个centos镜像来练习。禁忌:不要把docker当作虚拟机使用,这里只是为了学习
[root@VM-0-5-centos ~]# docker pull centos
Using default tag: latest
latest: Pulling from library/centos
a1d0c7532777: Pull complete
Digest: sha256:a27fd8080b517143cbbbab9dfb7c8571c40d67d534bbdee55bd6c473f432b177
Status: Downloaded newer image for centos:latest
docker.io/library/centos:latest
docker run [可选参数] 镜像ID运行容器参数说明:
–name=”Name” 容器名字 tomcat01,tomcat02,用来区分容器
-d 后台运行方式(有坑,当不给设置前台进程时,会直接退出)
-it 使用交互方式运行,进入容器查看内容
-p 指定容器的端口 -p 8080:8080
-p ip:主机端口号:容器端口
-p 主机端口号:容器端口(常用)
-p 容器端口
-P 随机指定端口
# 以交互方式运行docker里面的centos
[root@VM-0-5-centos ~]# docker run -it centos /bin/bash

# docker中centos的ls命令,注意看:root@后面
[root@c12f3268e2b4 /]# ls
bin  dev  etc  home  lib  lib64  lost+found  media  mnt  opt  proc  root  run  sbin  srv  sys  tmp  usr  var
# 退出当前容器
[root@c12f3268e2b4 /]# exit
exit

# 服务器真实的ls命令
[root@VM-0-5-centos ~]# ls
sa_recovery.log  sa_recovery.log.bak  Steam
[root@VM-0-5-centos ~]#
dcoker ps列出正在运行的容器参数说明:
-a 列出历史运行过的所有的容器
-n=? 显示最近创建的几个容器
-q 只显示容器的编号
# 列出正在运行的容器 [root@VM-0-5-centos ~]# docker ps CONTAINER ID IMAGE COMMAND CREATED STATUS PORTS NAMES # 列出历史运行过的所有的容器 [root@VM-0-5-centos ~]# docker ps -a CONTAINER ID IMAGE COMMAND CREATED STATUS PORTS NAMES c12f3268e2b4 centos "/bin/bash" 16 hours ago Exited (0) 16 hours ago elegant_lovelace # 列出历史运行过的所有的容器,只显示编号 [root@VM-0-5-centos ~]# docker ps -aq c12f3268e2b4exit退出当前容器并停止运行Ctrl + P + Q退出当前容器不停止运行docker rm 容器Id删除容器# 删除所有容器1 [root@VM-0-5-centos ~]# docker rm $(docker ps -qa) # 删除所有容器2 [root@VM-0-5-centos ~]# docker ps -aq | xargs docker rmdocker start 容器id启动容器docker restart 容器id重启容器docker stop 容器id停止容器docker kill 容器id强制停止容器
Docker常用其他命令
docker run -d 镜像名后台启动容器# 后台启动centos [root@VM-0-5-centos ~]# docker run -d centos 26b6bff63675488bfd24ee8edfe11d41db3d6829e6ca0c5a280edd96fcb2f655 # 查看正在运行的容器 [root@VM-0-5-centos ~]# docker ps CONTAINER ID IMAGE COMMAND CREATED STATUS PORTS NAMES哎?我刚刚后台启动的centos呢??
常见的坑:
docker容器使用后台运行,就必须要有要一个前台进程,docker发现没有应用,就会自动停止。nginx,容器启动后,发现自己没有提供服务,就会立刻停止,就是没有程序了,所以访问是不生效的
docker logs -tf --tail ?显示最近的?条日志参数说明
-f 跟随最新日志滚动输出
-t 显示时间戳
-- tail ? 显示多少条日志
[root@VM-0-5-centos ~]# docker ps
CONTAINER ID   IMAGE     COMMAND     CREATED              STATUS              PORTS     NAMES
45a9c4dab4e4   centos    "/bin/sh"   About a minute ago   Up About a minute             adoring_wilbur

# 显示 45a9c4dab4e4 中的5条日志 并显示时间戳
[root@VM-0-5-centos ~]# docker logs -tf --tail 5 45a9c4dab4e4
2023-07-22T02:16:41.919509791Z bin  dev  etc  home  lib  lib64  lost+found  media  mnt  opt  proc  root  run  sbin  srv  sys  tmp  usr  var
2023-07-22T02:16:42.909968273Z sh-4.4# clear
2023-07-22T02:16:42.910167308Z sh: clear: command not found
2023-07-22T02:16:44.003014063Z sh-4.4# ls
2023-07-22T02:16:44.004496012Z bin  dev  etc  home  lib  lib64  lost+found  media  mnt  opt  proc  root  run  sbin  srv  sys  tmp  usr  var
要是没有日志,可以敲几个或者使用脚本方式自己编写打印日志:
docker run -d centos /bin/sh -c "while true;do echo 我是日志...... ;sleep 1;done"docker top 容器id查看容器中的进程信息[root@VM-0-5-centos ~]# docker top 45a9c4dab4e4 UID PID PPID C STIM TTY TIME CMD root 1281 1255 0 10:16 pts/0 00:00:00 /bin/sh [root@VM-0-5-centos ~]#docker inspect 容器id查看容器的元数据# 查看 4eb302c01941 容器的配置信息(下面贴出来的部分省略) [root@VM-0-5-centos ~]# docker inspect 4eb302c01941 [ { "Id": "4eb302c01941dd5d1d87390e606c823277892e78146cbf98326ef68c1e3b9d1a", "Created": "2023-07-22T02:28:43.722770778Z", "Path": "/bin/bash", "Args": [ "-c", "while true;do echo 我是日志...... ;sleep 1;done" ], "State": { "Status": "running", "Running": true, "Paused": false, "Restarting": false, "OOMKilled": false, "Dead": false, "Pid": 14848, "ExitCode": 0, "Error": "", "StartedAt": "2023-07-22T03:30:35.879820821Z", "FinishedAt": "2023-07-22T02:29:41.643196662Z" }, "Image": "sha256:5d0da3dc976460b72c77d94c8a1ad043720b0416bfc16c52c45d4847e53fadb6", ... "NetworkSettings": { "Bridge": "", "SandboxID": "ced489be2a1766c79e4e8dd1bb05dc7fee08d925ca23b78d4d486f443d688690", "HairpinMode": false, "LinkLocalIPv6Address": "", "LinkLocalIPv6PrefixLen": 0, "Ports": {}, "SandboxKey": "/var/run/docker/netns/ced489be2a17", "SecondaryIPAddresses": null, "SecondaryIPv6Addresses": null, "EndpointID": "dca9cd9f5a5103c02fcb29a7bc15cd3bb67d94da20a0cc7ceffc1fa97f3d8346", "Gateway": "172.17.0.1", "GlobalIPv6Address": "", "GlobalIPv6PrefixLen": 0, "IPAddress": "172.17.0.3", "IPPrefixLen": 16, "IPv6Gateway": "", "MacAddress": "02:42:ac:11:00:03", "Networks": { "bridge": { "IPAMConfig": null, "Links": null, "Aliases": null, "NetworkID": "e7ef1665d7a01dda73a28ba88c3a9bffa56b051c84f158c8b044859779b9b4c4", "EndpointID": "dca9cd9f5a5103c02fcb29a7bc15cd3bb67d94da20a0cc7ceffc1fa97f3d8346", "Gateway": "172.17.0.1", "IPAddress": "172.17.0.3", "IPPrefixLen": 16, "IPv6Gateway": "", "GlobalIPv6Address": "", "GlobalIPv6PrefixLen": 0, "MacAddress": "02:42:ac:11:00:03", "DriverOpts": null } } } } ]dcoker exec -it 容器id进入正在运行的容器内(开启一个新的终端执行命令)[root@VM-0-5-centos ~]# docker ps CONTAINER ID IMAGE COMMAND 4eb302c01941 centos "/bin/bash -c 'while…" 45a9c4dab4e4 centos "/bin/sh" # 进入容器 4eb302c01941 里面 [root@VM-0-5-centos ~]# docker exec -it 4eb302c01941 /bin/bash [root@4eb302c01941 /]# ps -ef UID PID PPID C STIME TTY TIME CMD root 1 0 0 03:30 ? 00:00:00 /bin/bash -c while true;do echo ????????????...... ;sleep 1;done root 404 0 0 03:37 pts/0 00:00:00 /bin/bash root 507 0 0 03:38 pts/1 00:00:00 /bin/bash root 523 1 0 03:38 ? 00:00:00 /usr/bin/coreutils --coreutils-prog-shebang=sleep /usr/bin/sleep 1 root 524 507 0 03:38 pts/1 00:00:00 ps -efdocker attach 容器id进入正在运行的容器内(执行原来启动这个容器时的终端)docker cp 容器id:dir1/a dir2复制容器id里dir1目录中的a文件到服务器的dir2目录[root@VM-0-5-centos ~]# docker ps CONTAINER ID IMAGE COMMAND 4eb302c01941 centos "/bin/bash -c 'while…" # 进入容器,新开一个终端 [root@VM-0-5-centos ~]# docker exec -it 4eb302c01941 /bin/bash [root@4eb302c01941 /]# cd /home [root@4eb302c01941 home]# ls # 在容器centos内部创建一个`test.txt`文件,输入内容:Hello,My name is test..... [root@4eb302c01941 home]# vi test.txt [root@4eb302c01941 home]# cat test.txt Hello,My name is test..... # 退出容器 [root@4eb302c01941 home]# exit exit [root@VM-0-5-centos ~]# docker ps CONTAINER ID IMAGE COMMAND 4eb302c01941 centos "/bin/bash -c 'while…" # 复制容器centos内部刚刚创建的那个`test.txt`文件到服务器的当前目录 [root@VM-0-5-centos ~]# docker cp 4eb302c01941:/home/test.txt ./ Successfully copied 2.05kB to /root/./ # 查看当前目录,存在test.txt,并且内容就是刚刚在容器内部的创建的那个文件内容 [root@VM-0-5-centos ~]# ls sa_recovery.log sa_recovery.log.bak Steam test.txt [root@VM-0-5-centos ~]# cat test.txt Hello,My name is test.....复制文件不用容器运行。也可以复制历史运行过的容器,只要容器还在
如果需要把服务器的文件复制到容器内部:
docker cp dir3/test.txt 容器id:dir4,把当前目录的test.txt复制到容器的dir4目录
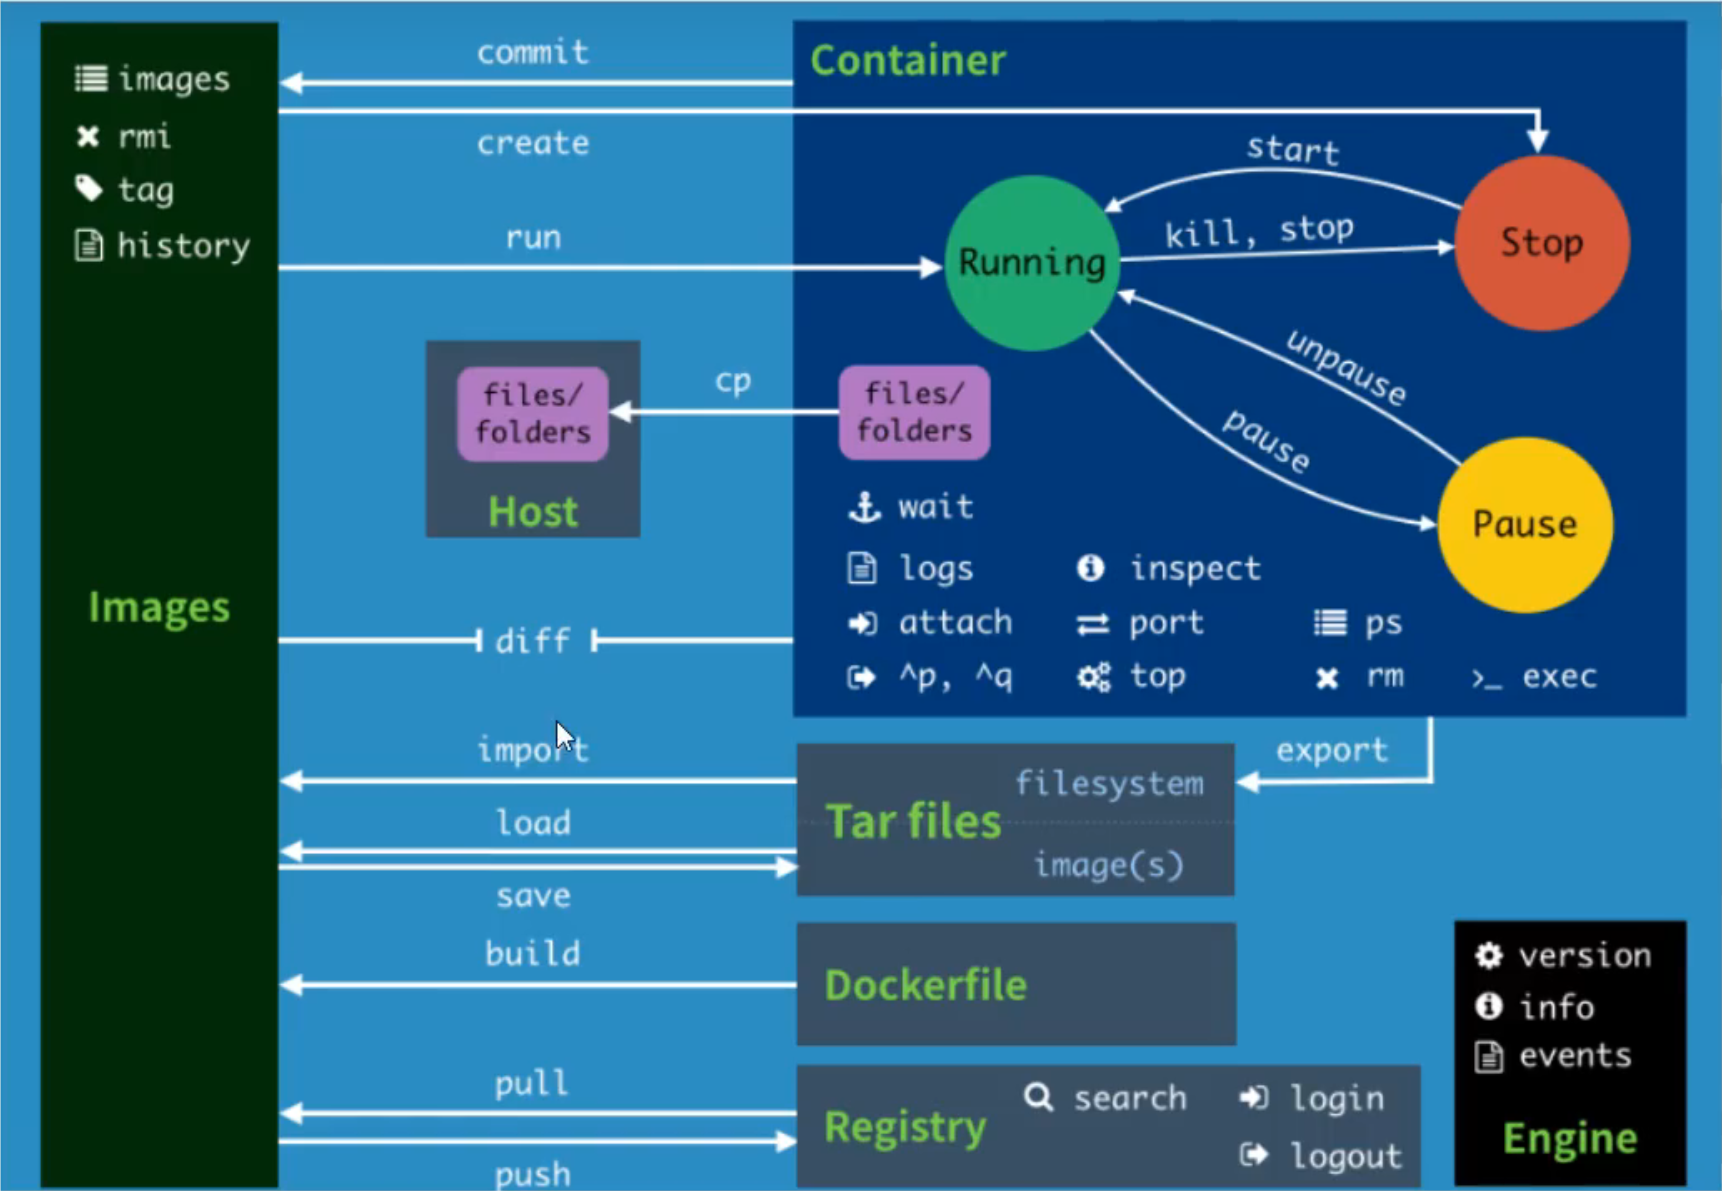
Docker命令小结
Docker命令练习
部署Nginx
# 以后台方式运行nginx,取名为nginx01,外部端口8080映射到容器内部80
[root@VM-0-5-centos ~]# docker run -d --name nginx01 -p 8080:80 nginx
fd046b30b032ccf9f4fb0d7971878972b4cd37c9c6219b7205583480663bf4d3

[root@VM-0-5-centos ~]# docker ps
CONTAINER ID   IMAGE     COMMAND	CREATED			PORTS  								   NAMES
fd046b30b032   nginx     "/docker-entrypoint.…"   0.0.0.0:8080->80/tcp, :::8080->80/tcp   nginx01

# 使用curl测试访问8080端口,看能不能显示nginx主页
[root@VM-0-5-centos ~]# curl localhost:8080
<!DOCTYPE html>
<html>
<head>
<title>Welcome to nginx!</title>
<style>
html { color-scheme: light dark; }
body { width: 35em; margin: 0 auto;
font-family: Tahoma, Verdana, Arial, sans-serif; }
</style>
</head>
<body>
<h1>Welcome to nginx!</h1>
<p>If you see this page, the nginx web server is successfully installed and
working. Further configuration is required.</p>

<p>For online documentation and support please refer to
<a href="http://nginx.org/">nginx.org</a>.<br/>
Commercial support is available at
<a href="http://nginx.com/">nginx.com</a>.</p>

<p><em>Thank you for using nginx.</em></p>
</body>
</html>
[root@VM-0-5-centos ~]#
部署Tomcat
# 拉取9.0的镜像
[root@VM-0-5-centos ~]# docker pull tomcat:9.0
9.0: Pulling from library/tomcat
0e29546d541c: Pull complete
......
b93639122cb4: Pull complete
Digest: sha256:cd96d4f7d3f5fc4d3bc1622ec678207087b8215d55021a607ecaefba80b403ea
Status: Downloaded newer image for tomcat:9.0
docker.io/library/tomcat:9.0

# 运行tomcat容器,以8080端口映射到容器内的8080端口
[root@VM-0-5-centos ~]# docker run --name tomcat01 -p 8080:8080 tomcat

# 访问公网pi:8080,发现能进去,但是为404界面,进入容器 复制默认网站到webapp目录
[root@VM-0-5-centos ~]# docker exec -it  f1e6a444bd05 /bin/bash
root@f1e6a444bd05:/usr/local/tomcat# pwd
/usr/local/tomcat
root@f1e6a444bd05:/usr/local/tomcat# ls
BUILDING.txt  CONTRIBUTING.md  LICENSE  NOTICE  README.md  RELEASE-NOTES  RUNNING.txt  bin  conf  lib  logs  native-jni-lib  temp  webapps  webapps.dist  work

root@f1e6a444bd05:/usr/local/tomcat# cp -r  webapps.dist/* ./
#再次访问公网ip:8080 端口就看到了tomcat的网站
部署ES+Kibaba
[root@VM-0-5-centos ~]# docker run -d --name elasticsearch -p 8080:9200 -p 8081:9300 -e "discovery.type=single-node" elasticsearch:7.17.10

# 访问容器的9200端口
[root@VM-0-5-centos ~]# curl localhost:8080
{
  "name" : "70db009be7f3",
  "cluster_name" : "docker-cluster",
  "cluster_uuid" : "3Bnp55RgRxq7kZmwPwvm2A",
  "version" : {
    "number" : "7.17.10",
    "build_flavor" : "default",
    "build_type" : "docker",
    "build_hash" : "fecd68e3150eda0c307ab9a9d7557f5d5fd71349",
    "build_date" : "2023-04-23T05:33:18.138275597Z",
    "build_snapshot" : false,
    "lucene_version" : "8.11.1",
    "minimum_wire_compatibility_version" : "6.8.0",
    "minimum_index_compatibility_version" : "6.0.0-beta1"
  },
  "tagline" : "You Know, for Search"
}

# 查看docker状态,发现elasticsearch占了大半内存
[root@VM-0-5-centos ~]# docker stats
CONTAINER ID   NAME            CPU %     MEM USAGE / LIMIT     MEM %     NET I/O          BLOCK I/O       PIDS
70db009be7f3   elasticsearch   0.29%     1.161GiB / 1.794GiB   64.69%    1.18kB / 1.3kB   141MB / 688kB   55
按照默认模式启动,会非常消耗内存,因此,需要通过参数限制其内存,增加参数
-e ES_JAVA_OPTS="-Xms64m,-Xmx512m"
[root@VM-0-5-centos ~]# docker images
REPOSITORY      TAG       IMAGE ID       CREATED         SIZE
elasticsearch   7.17.10   a305059888ba   3 months ago    622MB

[root@VM-0-5-centos ~]# docker run -d --name es -p 8080:9200 -p 8081:9300 -e "discovery.type=single-node" -e ES_JAVA_OPTS="-Xms50m -Xmx512m" a305059888ba

[root@VM-0-5-centos ~]# docker stats
CONTAINER ID   NAME      CPU %     MEM USAGE / LIMIT     MEM %     NET I/O           BLOCK I/O         PIDS
4c3bf1a8d612 es 0.21% 558.7MiB / 1.794GiB 30.40% 44.2MB / 1.72MB 65.3MB / 92.2MB 57[root@VM-0-5-centos ~]# docker run -d --name kibana -p 5601:5601 kibana:7.17.10
Unable to find image 'kibana:7.17.10' locally
7.17.10: Pulling from library/kibana
99803d4b97f3: Already exists
1b833df53080: Pull complete
3f550a4d40b2: Pull complete
9db648d59d34: Pull complete
dcb1f897f694: Pull complete
4f4fb700ef54: Pull complete
f75409cbb707: Pull complete
43502892358b: Pull complete
056fa2eee2ce: Pull complete
77aff48366b1: Pull complete
d5e7789a1859: Pull complete
a01160071b90: Pull complete
f342da3964c7: Pull complete
48487d0402f9: Pull complete
Digest: sha256:85f56231725dfb4a2663388fa8343926de043e5ce05e787e6fbc965eac0c3b3f
Status: Downloaded newer image for kibana:7.17.10
51298c3c7ef659100a2adb77f854106b61274c2a29dbc8dd7b51fd81327993e2Dockers可视化界面
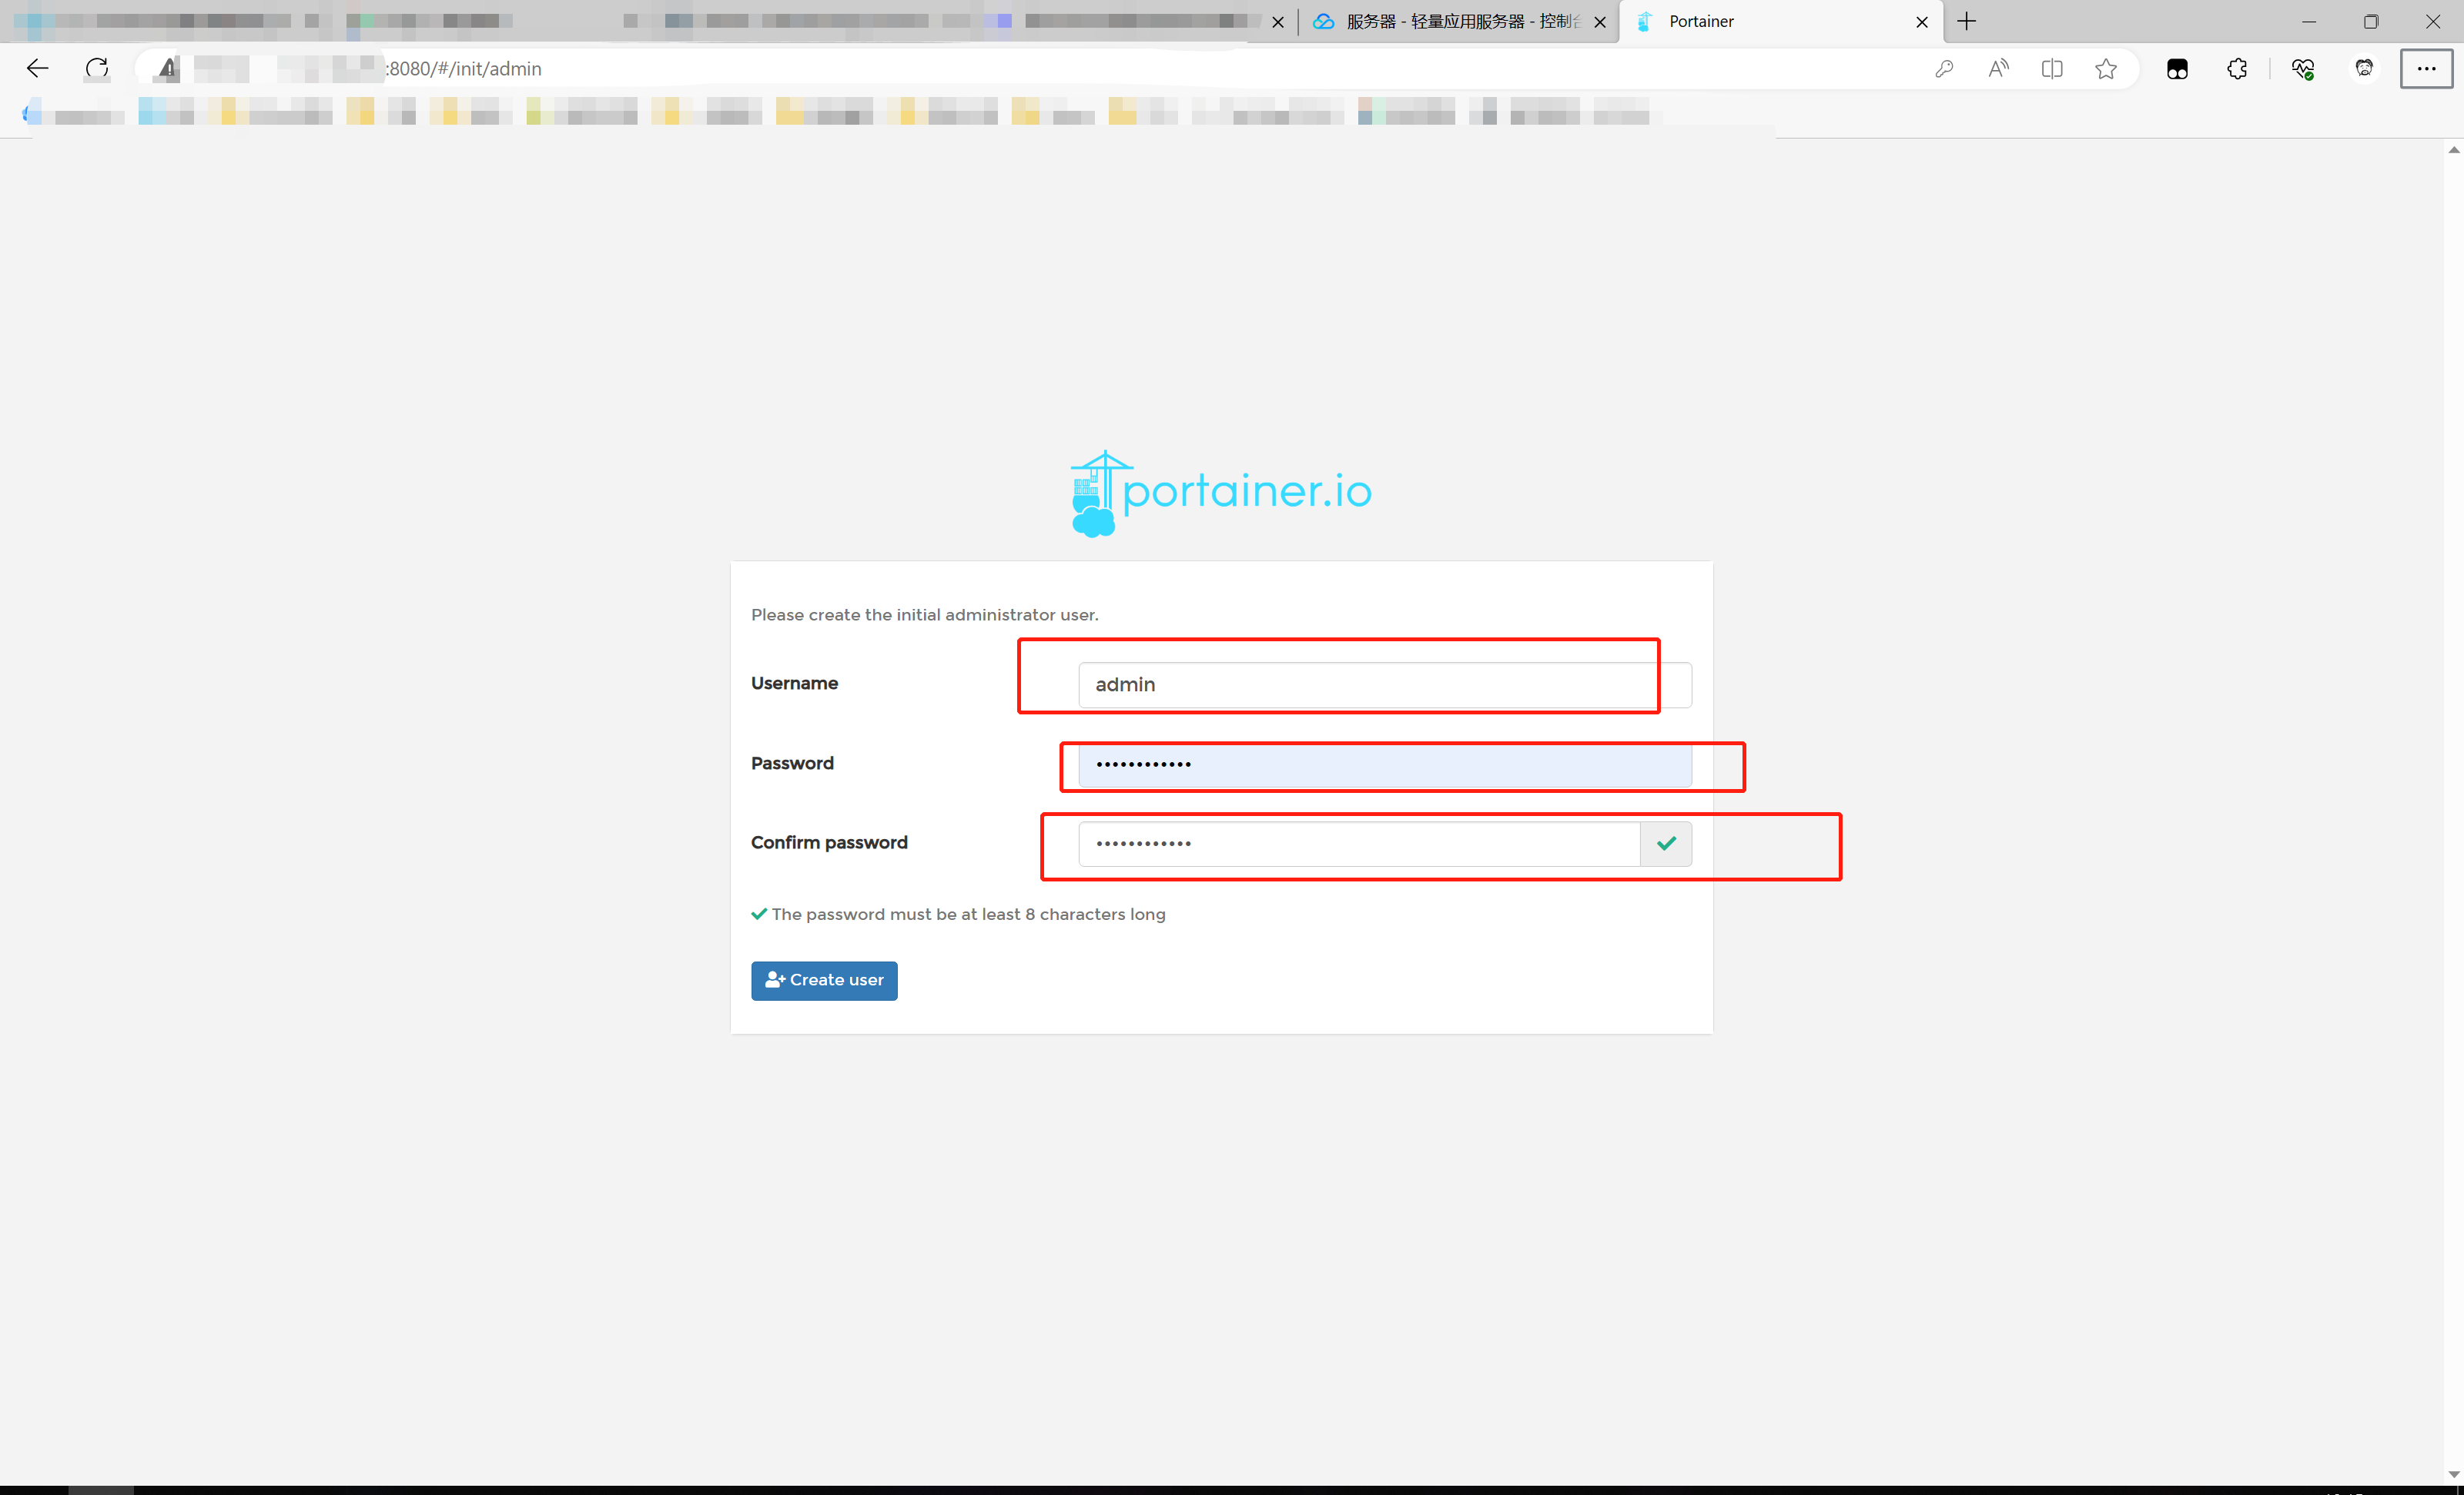
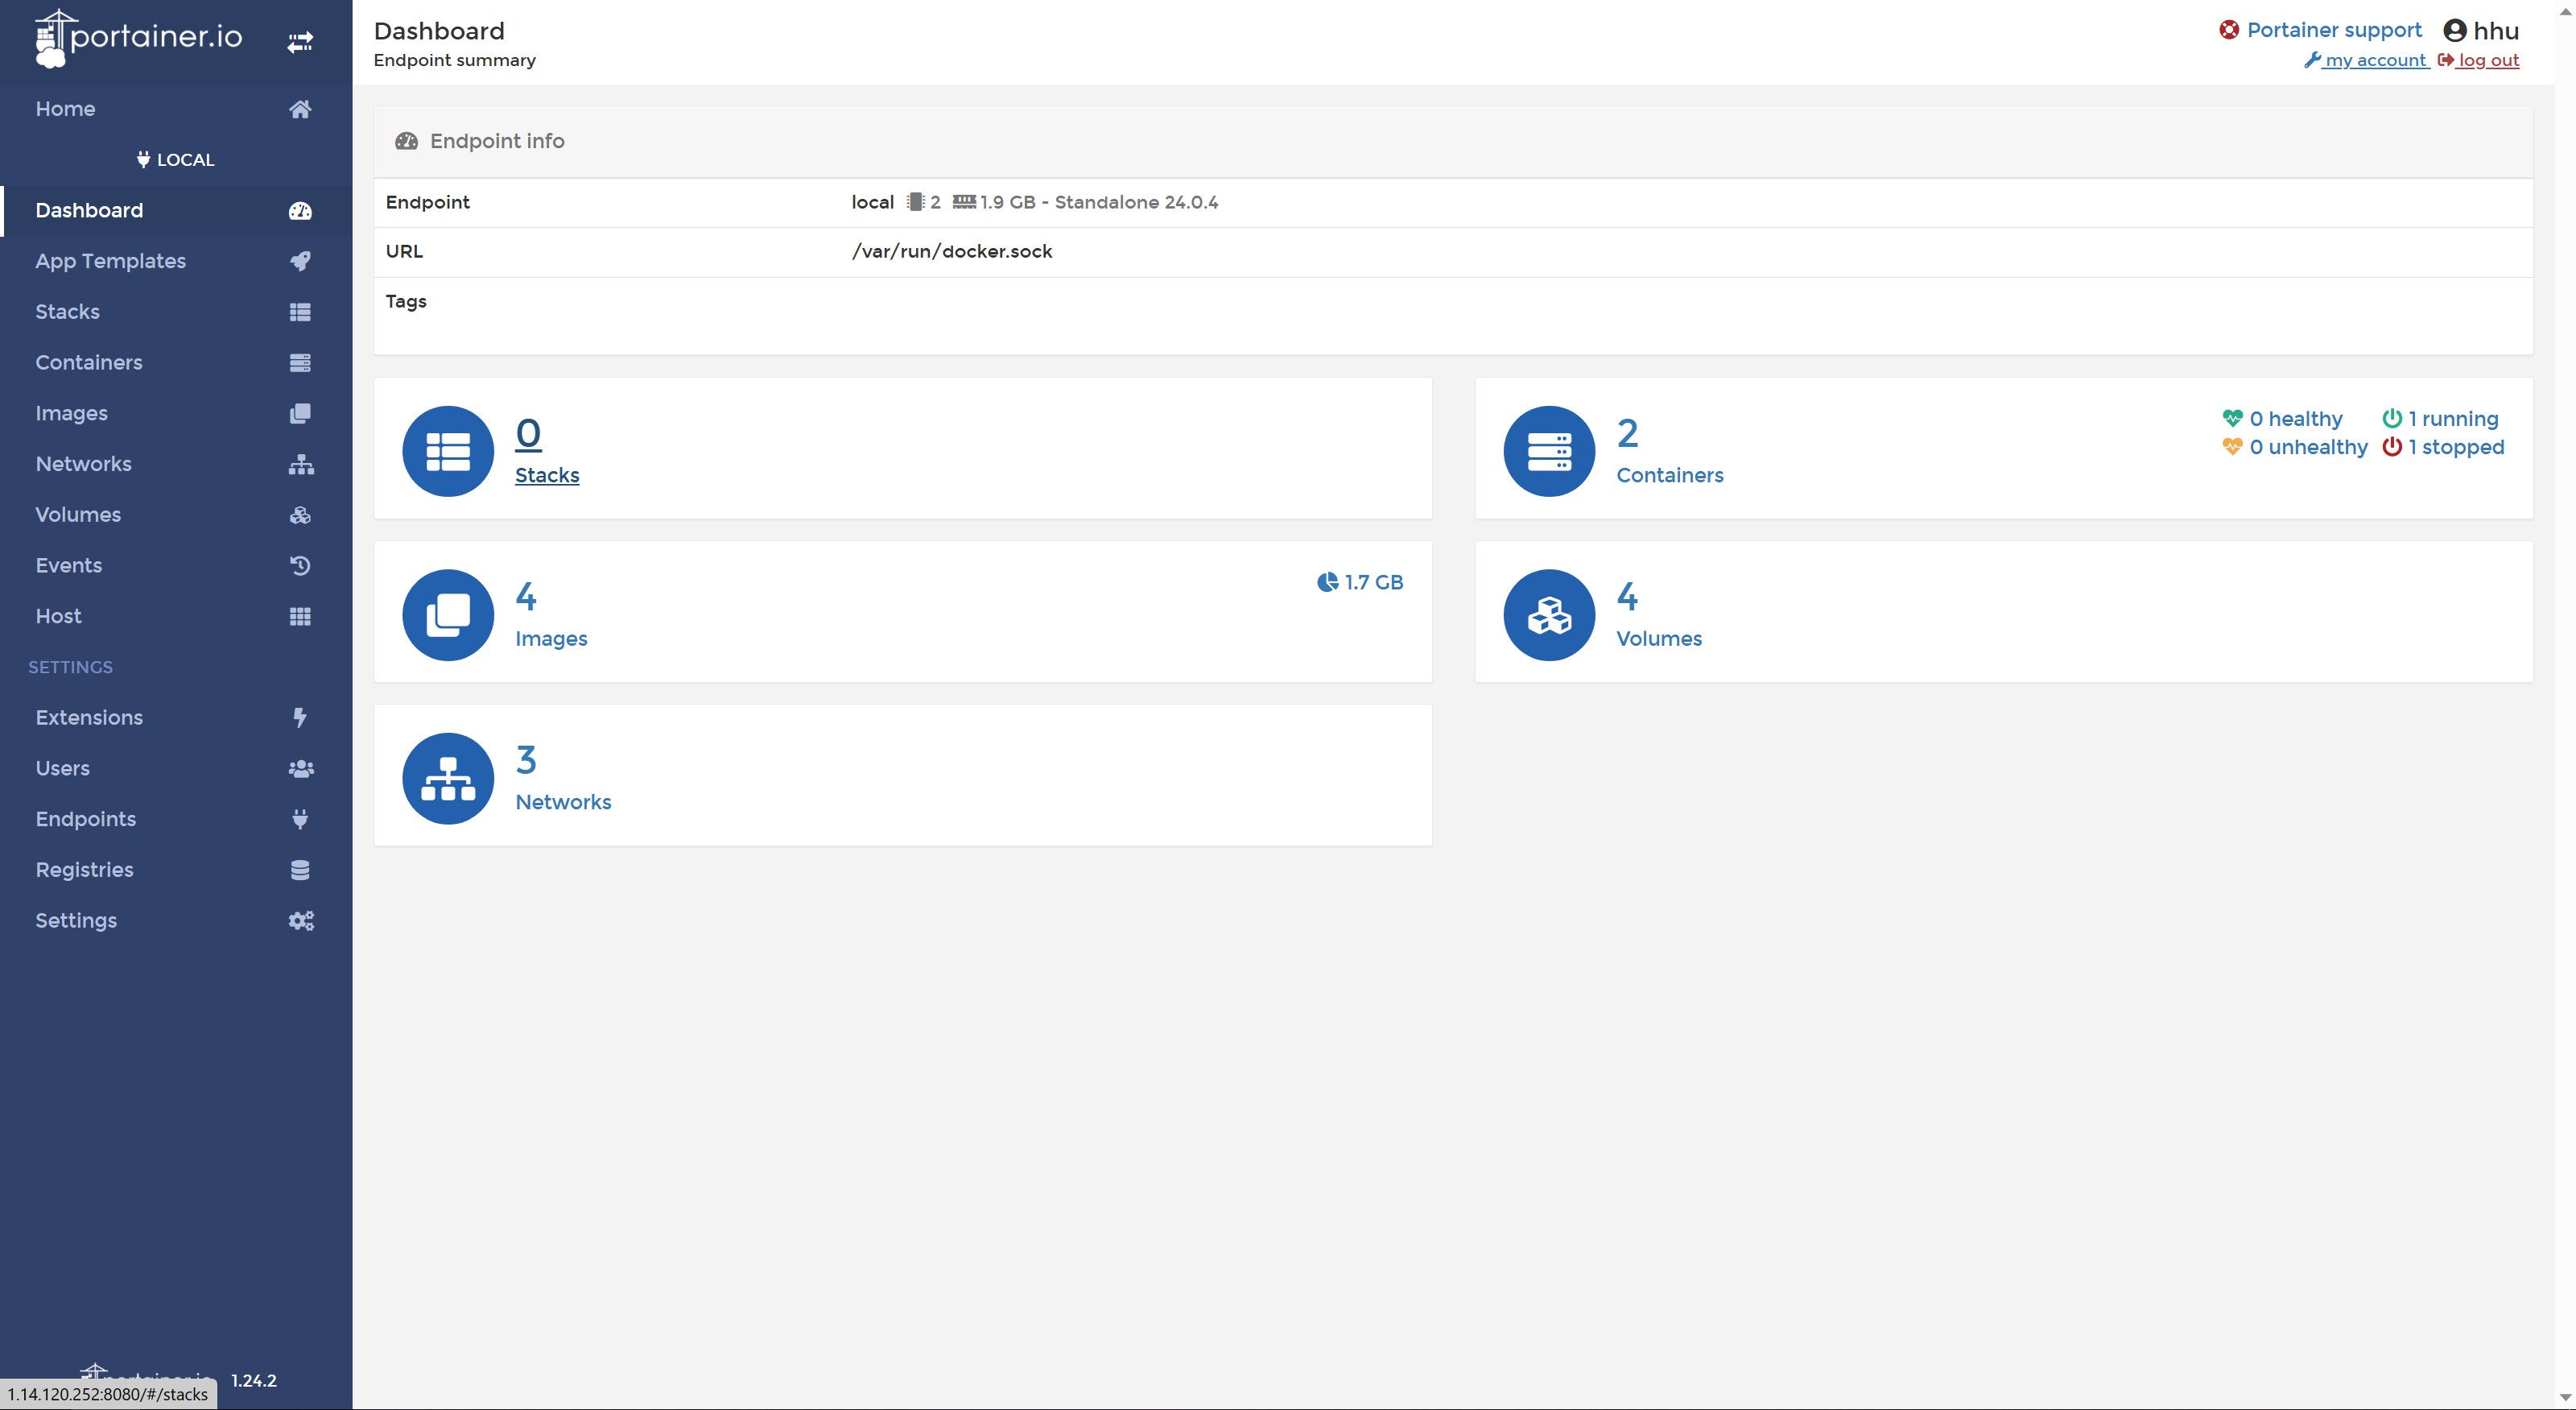
Portainer
安装
# 安装 portainer
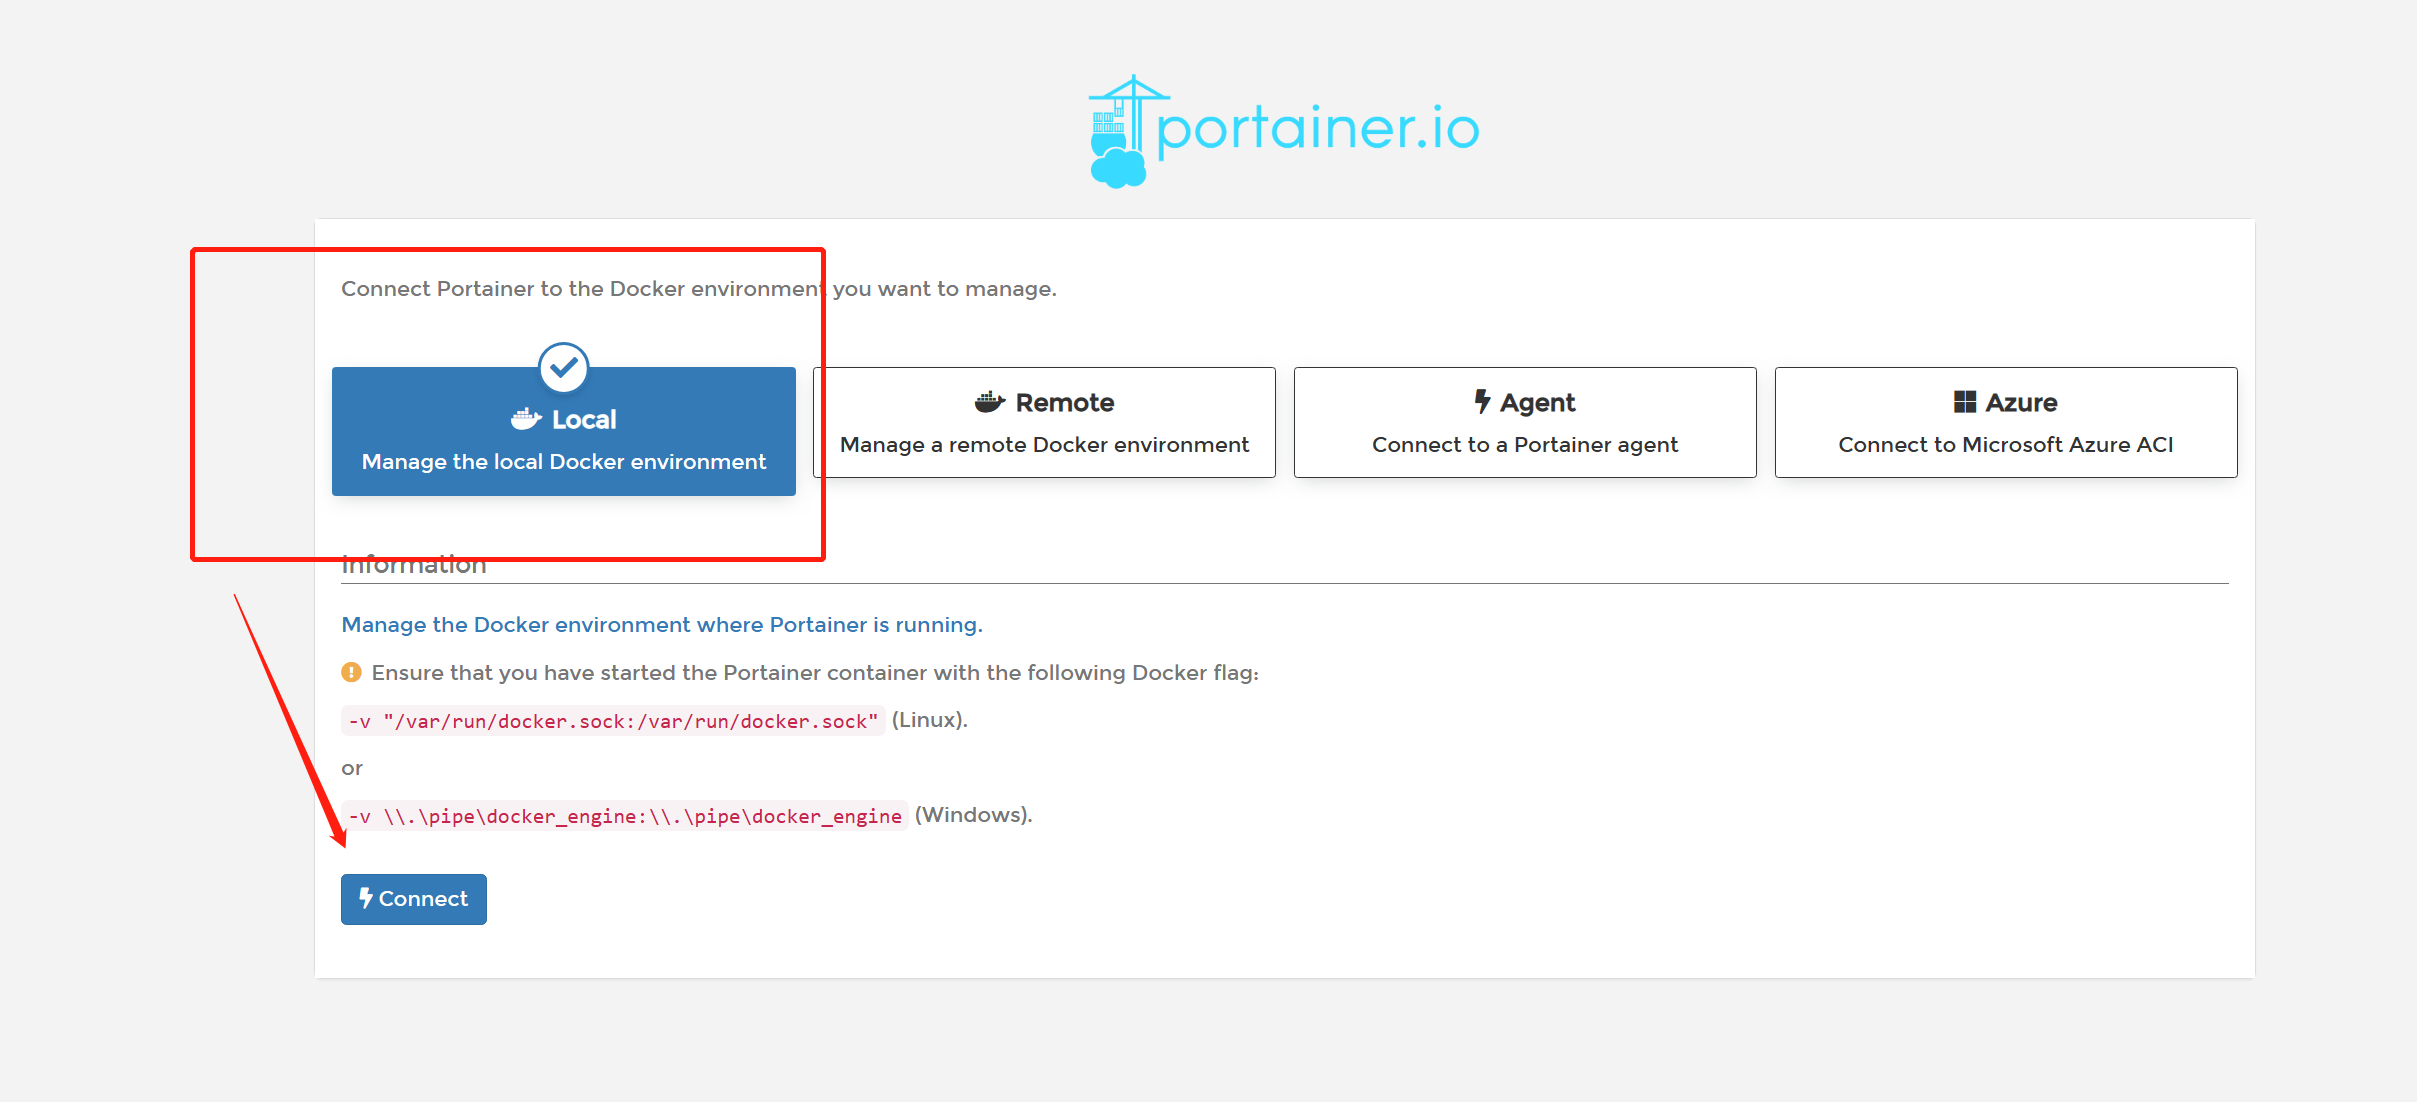
[root@VM-0-5-centos ~]# docker run -d -p 8080:9000 --restart=always -v /var/run/docker.sock:/var/run/docker.sock --privileged=true portainer/portainer访问:公网ip:8080
创建用户,并选择Local

Docker镜像讲解
镜像是什么
镜像是一种轻量级、可执行的独立软件包,用来打包软件运行环境和基于运行环境开发的软件,它包含运行某个软件所需的所有内容,包括代码、运行时、库、环境变量和配置文件。浅显的讲类似于手机上的一个应用安装包(apk)
从哪儿获得镜像
- 远程仓库下载
- 别处拷贝
- 自己制作DockerFile
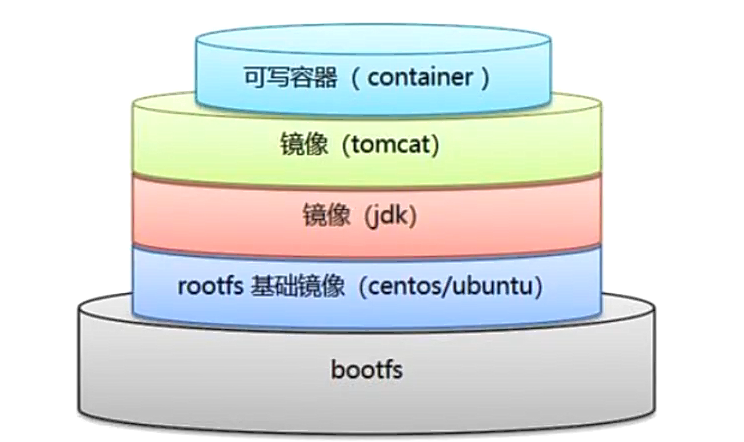
Docker镜像加载原理
UnionFS(联合文件系统)Union文件系统(UnionFS)是一种分层、轻量级并且高性能的文件系统,它支持对文件系统的修改作为一次提交来一层层的叠加,同时可以将不同目录挂载到同一个虚拟文件系统下。Union文件系统是Docker镜像的基础。镜像可以通过分层来进行继承,基于基础像(没有父镜像),可以制作各种具体的应用镜像。
特性:一次同时加载多个文件系统,但从外面看起来,只能看到一个文件系统,联合加载会把各层文件系统叠加起来,这样最终的文件系统会包含所有底层的文件和目录
docker的镜像实际上由一层一层的文件系统组成,这种层级的文件系统UnionFS。
bootfs(boot file system)主要包含bootloader和kernel, bootloader主要是引导加载kernel, Linux刚启动时会加载bootfs文件系统,在Docker镜像的最底层是bootfs。这一层与我们典型的Linux/Unix系统是一样的,包含boot加载器和内核。当boot加载完成之后整个内核就都在内存中了,此时内存的使用权已由bootfs转交给内核,此时系统也会卸载bootfs。
rootfs (root file system),在bootfs之上。包含的就是典型Linux 系统中的/dev,/proc,/bin,/etc等标准目录和文件。rootfs就是各种不同的操作系统发行版,比如Ubuntu,CentOS等等
为什么Docker的镜像CentOS大小只有200M,但是真正安装的iso镜像却有几个G?
因为Docker中的CentOS镜像底层库使用的是服务器原来的,底层使用的是Host的Kernel,自己只需要提供rootfs就可以了,精简过的镜像rootfs也可以很小,只需要基本的命令(像ps,pwd等)、工具和程序库就可以。由此可见,针对于不同Linux的发行版,bootfs基本一致,rootfs会有差别,所以不同系统可以公用bootfs。
[root@VM-0-5-centos ~]# docker pull redis
Using default tag: latest
latest: Pulling from library/redis
a2abf6c4d29d: Already exists 		# 已经下载过的,直接拿过来用
c7a4e4382001: Pull complete
4044b9ba67c9: Pull complete
c8388a79482f: Pull complete
413c8bb60be2: Pull complete
1abfd3011519: Pull complete
Digest: sha256:db485f2e245b5b3329fdc7eff4eb00f913e09d8feb9ca720788059fdc2ed8339
Status: Downloaded newer image for redis:latest
docker.io/library/redis:latest
[root@VM-0-5-centos ~]# 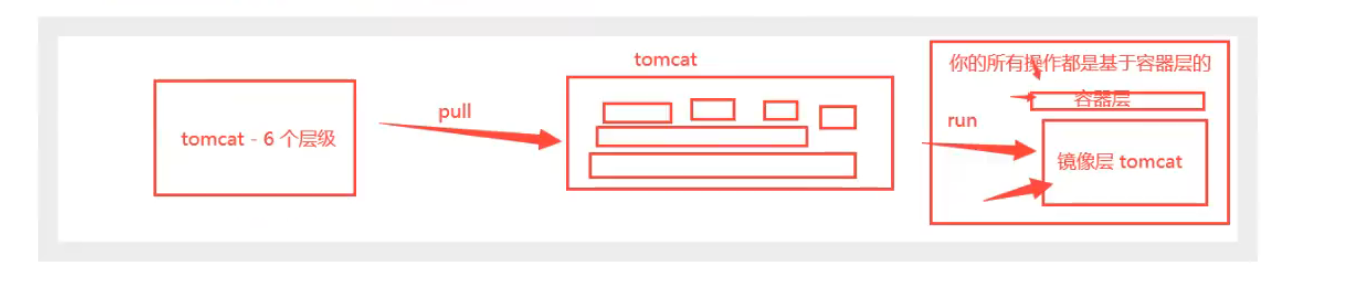
提交自己的镜像
启动一个默认的tomcat
修改tomcat
docker commit 提交,-m 修改的备注 -a 作者 tomcat_hh_1.0 版本号
docker commit -m=”xxxxx” -a=”xx” 容器id 镜像名:版本号查看镜像列表(docker images)
[root@VM-0-5-centos ~]# docker ps
CONTAINER ID   IMAGE			PORTS                                    NAMES
9316cde12d4d   tomcat:8.5   0.0.0.0:8081->8080/tcp, :::8081->8080/tcp   tomcat01

[root@VM-0-5-centos ~]# docker commit -m "初始化tomcat界面" -a "hhu" 9316cde12d4d tomcat_hhu:1.0
sha256:8fcc6c1f0ad9e3d74adab15e89fc72df47a383eff2fadd439665179873290c96

[root@VM-0-5-centos ~]# docker images
REPOSITORY            TAG       IMAGE ID       CREATED         SIZE
tomcat_hhu            1.0       8fcc6c1f0ad9   4 seconds ago   683MB
tomcat                8.5       2d2bccf89f53   19 months ago   678MB
Docker数据卷
问题:删除容器之后,容器内的数据一并删除了,有时候需要保留数据,所以就需要使用数据卷技术,使用容器的持久化和同步操作。
它们类似共享文件占用一块存储,不会存两份;
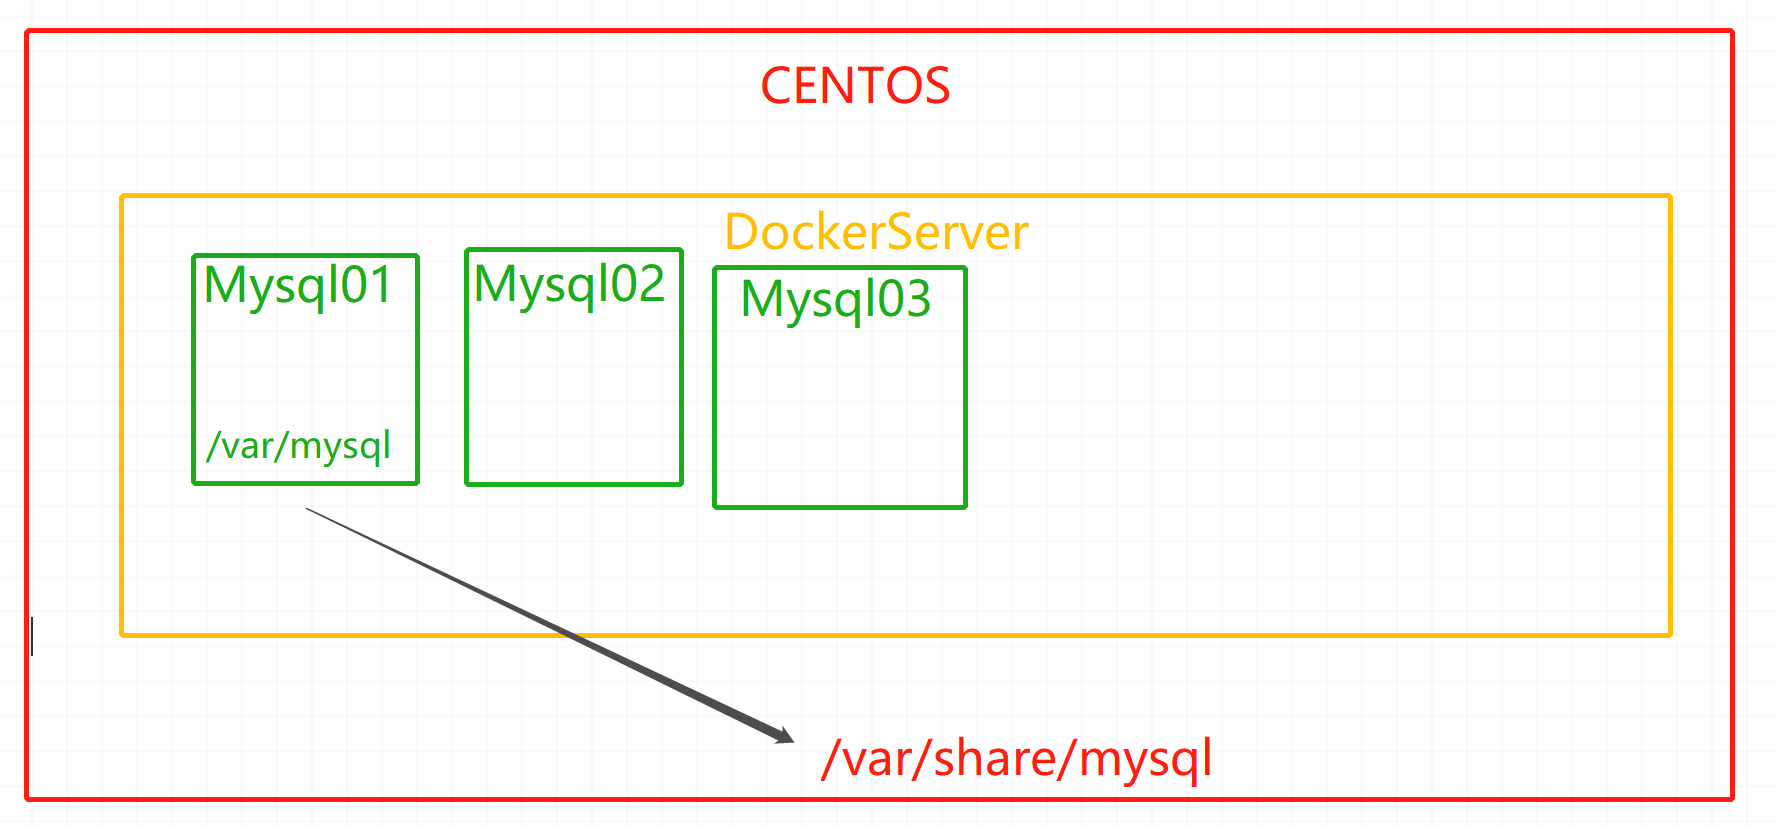
挂载就是主机往容器挂的,源是主机,挂载就是将宿主机的一部分空间共享给容器一起用(因此数据卷也可以用来做扩容!!)宿主机和容器都可以数据共享。
即使容器被停止,在宿主机操作的挂载目录下的文件,还是能映射进容器内的。
方式1:直接使用命令
-v 源目录(主机目录)xxx:容器内目录xxx路径挂载还有另外两种:具名挂载、匿名挂载
具名挂载:
docker -v xxx:dir1xxx挂载的数据卷的名字匿名挂载:
docker -v dir1随机生成一个哈希值的名字
docker run -it -v /var/share/mysql:/var/mysql方式2:使用
DockerFile
卷的其他命令:
查看所有卷信息:
docker volume ls查看卷的具体挂载路径:
docker volume inspect 卷名或者卷Id
具名挂载/匿名挂载
[root@VM-0-5-centos home]# docker volume ls
DRIVER    VOLUME NAME
local     69bf15b9adf3bfbc18d5c518f023d3291a5193f42abc924f6b4d7b8997778c33
# 具名挂载(mysql01)
[root@VM-0-5-centos home]# docker run -d -v mysql01:/etc/mysql/conf/conf.d -p 8080:3306 -e MYSQL_ROOT_PASSWORD=123456 mysql:8.0.12
316e4a49f78be6045382636271928514a313e4ae4f24ca09978df42cdd73fc49
[root@VM-0-5-centos home]# docker volume ls
DRIVER    VOLUME NAME
local     mysql01
[root@VM-0-5-centos home]# docker volume inspect mysql01
[
    {
        "CreatedAt": "2023-07-28T10:34:05+08:00",
        "Driver": "local",
        "Labels": null,
        "Mountpoint": "/var/lib/docker/volumes/mysql01/_data",		# 实际路径
        "Name": "mysql01",
        "Options": null,
        "Scope": "local"
    }
]
# 匿名挂载
[root@VM-0-5-centos home]# docker run -d -v /etc/mysql/conf/conf.d -p 8081:3306 -e MYSQL_ROOT_PASSWORD=123456 mysql:8.0.12
ac0ca411a06468ee42c1918d3bf1fd5df9f823770aa9e2d03ac7aeb59fce373f
[root@VM-0-5-centos home]# docker volume ls
DRIVER    VOLUME NAME
local     781640e41dd83c31b0c96041a111f3d87c8527cf522a31f7e5788a0f4baee2c1
local     e5984bfcaa862a65103fa2c593c4afc9b33973085c996dd6246d9aa5809ebf43
local     mysql01

[root@VM-0-5-centos home]# docker ps
CONTAINER ID   IMAGE          COMMAND    ...
ac0ca411a064   mysql:8.0.12   "docker-entrypoint.s…"   ...

# 这样找起来非常麻烦
[root@VM-0-5-centos home]# docker inspect ac0ca411a064
......
        "Mounts": [
            {
                "Type": "volume",
                "Name": "e5984bfcaa862a65103fa2c593c4afc9b33973085c996dd6246d9aa5809ebf43",
                "Source": "/var/lib/docker/volumes/e5984bfcaa862a65103fa2c593c4afc9b33973085c996dd6246d9aa5809ebf43/_data", #真实路径
                "Destination": "/var/lib/mysql",
                "Driver": "local",
                "Mode": "",
                "RW": true,
                "Propagation": ""
            },
            {
                "Type": "volume",
                "Name": "781640e41dd83c31b0c96041a111f3d87c8527cf522a31f7e5788a0f4baee2c1",
                "Source": "/var/lib/docker/volumes/781640e41dd83c31b0c96041a111f3d87c8527cf522a31f7e5788a0f4baee2c1/_data", #真实路径
                "Destination": "/etc/mysql/conf/conf.d",
                "Driver": "local",
                "Mode": "",
                "RW": true,
                "Propagation": ""
            }
        ],
......
[root@VM-0-5-centos home]# 可以看出不管是具名挂载还是匿名挂载,实际的路径都是挂载在/var/lib/docker/volumes下的,只不过具名挂载会生成定义的那个名字的文件夹,匿名会是一些哈希值的文件夹。
方式1:实战——MySQL数据卷测试
当前目录(/root)下没有mysql
[root@VM-0-5-centos ~]# ls
- sa_recovery.log sa_recovery.log.bak Steam
# 以后台方式
[root@VM-0-5-centos ~]# docker run -d --name=mysql -p 8080:3306 -v /home/mysql/conf:/etc/mysql/conf.d -v /home/mysql/data/:/var/lib/mysql -e MYSQL_ROOT_PASSWORD=123456 mysql:8.0.12
1859371ac66e8d286ac7c7e15a5e12e1d16f3ca02df648f3a88185f2afb45b7e
[root@VM-0-5-centos ~]# [root@VM-0-5-centos ~]# docker inspect 1859371ac66e
......
"Mounts": [
{
"Type": "bind",
"Source": "/root/mysql/conf",
"Destination": "/etc/mysql/conf.d",
"Mode": "",
"RW": true,
"Propagation": "rprivate"
},
{
"Type": "bind",
"Source": "/root/mysql/data",
"Destination": "/var/lib/mysql",
"Mode": "",
"RW": true,
"Propagation": "rprivate"
}
]
......
[root@VM-0-5-centos data]# pwd
/root/mysql/data
[root@VM-0-5-centos data]# ls
auto.cnf binlog.index client-cert.pem ibdata1 ibtmp1 performance_schema server-cert.pem undo_001
binlog.000001 ca-key.pem client-key.pem ib_logfile0 mysql private_key.pem server-key.pem undo_002
binlog.000002 ca.pem ib_buffer_pool ib_logfile1 mysql.ibd public_key.pem sys
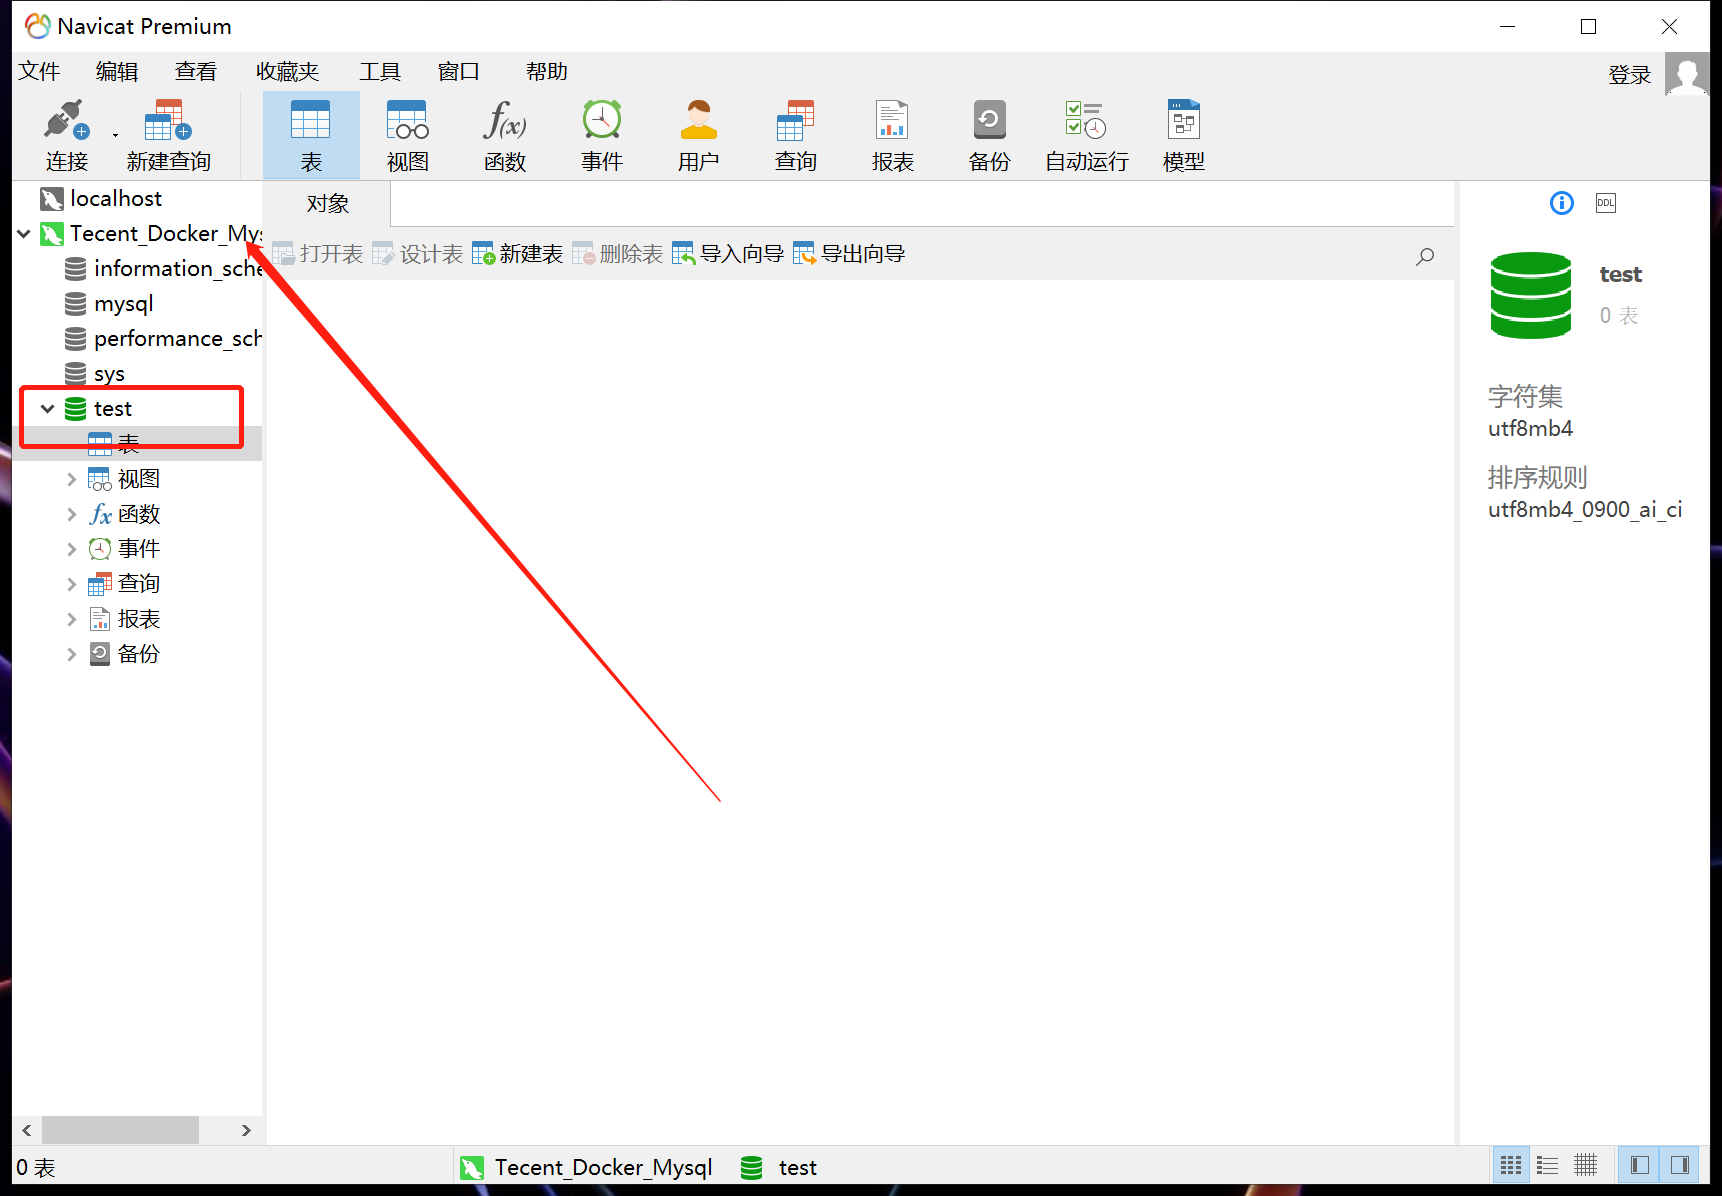
[root@VM-0-5-centos data]# 在Windows上通过Navicat连接连接数据库:
主机:服务器公网IP
端口:8080(上面暴露给外面的端口)
用户名:root
密码:上面参数中的123456(-e MYSQL_ROOT_PASSWORD=123456)
创建一个test数据库,在服务器上查看目录内是否有新建的数据库
[root@VM-0-5-centos data]# ls
auto.cnf       ......  test  # 这个就是刚才在navicat中创建的test数据库  ......  undo_002

# 现在我们停掉容器,删除容器,看数据库信息是否还在
[root@VM-0-5-centos data]# docker kill 1859371ac66e
3476c8674a61
[root@VM-0-5-centos data]# docker rm 1859371ac66e
3476c8674a61
[root@VM-0-5-centos data]# ls
auto.cnf       ......  test  # 这个就是刚才在navicat中创建的test数据库  ......   undo_002

[root@VM-0-5-centos data]# docker ps -a
CONTAINER ID   IMAGE            COMMAND           CREATED      STATUS                PORTS     NAMES
拓展:
使用
docker -v 容器内路径:ro/rw来改变容器内目录的读写权限ro - readonly - 只读
rw - readwrite - 可读可写(默认)
# 容器内只读
[root@VM-0-5-centos ~]# docker run -it --name centos01 -v centos01:/home/test:ro centos /bin/bash
[root@8e47b81c532d /]# cd /home/test/
[root@8e47b81c532d test]# ls
[root@8e47b81c532d test]# touch aa.txt
# 可以看到是不可以创建文件的
touch: cannot touch 'aa.txt': Read-only file system

# 宿主机上操作
[root@VM-0-5-centos ~]# docker volume ls
DRIVER    VOLUME NAME
local     centos01
[root@VM-0-5-centos ~]# docker volume inspect centos01
[
    {
        "CreatedAt": "2023-07-28T13:36:28+08:00",
        "Driver": "local",
        "Labels": null,
        "Mountpoint": "/var/lib/docker/volumes/centos01/_data",
        "Name": "centos01",
        "Options": null,
        "Scope": "local"
    }
]
[root@VM-0-5-centos ~]# cd /var/lib/docker/volumes/centos01/_data
[root@VM-0-5-centos _data]# touch test1.txt
[root@VM-0-5-centos _data]# ll
total 0
-rw-r--r-- 1 root root 0 Jul 28 13:38 test1.txt

[root@VM-0-5-centos _data]# docker attach 8e47b81c532d
[root@8e47b81c532d test]# ls
test1.txt
方式2:初尝DockerFile
Dockerfile就是用来构建docker镜像的构建文件的命令脚本!先体验一下!
使用
docker build命令来打包部分参数列表:
- f 指定要使用的Dockerfile路径
- t 镜像的名字及标签,通常 name:tag 或者 name 格式;可以在一次构建中为一个镜像设置多个标签
一个简单的DockerFile文件内容如下所示:
FROM centos
VOLUME ["volume01","volume02"]
CMD ECHO "------ END ------"
CMD /bin/bash
测试:
# 创建一个文件(没有后缀)
[root@VM-0-5-centos ~]# touch testDockerFile
[root@VM-0-5-centos ~]# vi testDockerFile
# 编写如下内容
[root@VM-0-5-centos ~]# cat testDockerFile
CMD ECHO "------ START ------"
FROM centos
VOLUME ["volume01","volume02"]
CMD ECHO "------ END ------"
CMD /bin/bash

# 最后这有个.,一定要注意
[root@VM-0-5-centos ~]# docker build -f /root/testDockerFile -t hhu_centos:1.0 .
[+] Building 0.1s (5/5) FINISHED                    						docker:default
 => [internal] load build definition from testDockerFile          			0.0s
 => => transferring dockerfile: 127B                        				0.0s
 => [internal] load .dockerignore        									0.0s
 => => transferring context: 2B   											0.0s
 => [internal] load metadata for docker.io/library/centos:latest  			0.0s
 => CACHED [1/1] FROM docker.io/library/centos   							0.0s
 => exporting to image   													0.0s
 => => exporting layers    													0.0s
 => => writing image sha256:90b92c4cee5f64154b91707603f7df4fadfab490411f9390169a32dd776b6749         0.0s
 => => naming to docker.io/library/hhu_centos:1.0     						0.0s

[root@VM-0-5-centos ~]# docker images
REPOSITORY            TAG       IMAGE ID       CREATED         SIZE
hhu_centos            1.0       90b92c4cee5f   22 months ago   231MB
centos                latest    5d0da3dc9764   22 months ago   231MB

[root@VM-0-5-centos ~]# docker run -it hhu_centos:1.0
[root@5fba373aa532 /]# ls
bin  dev  etc  home  lib  lib64  lost+found  media  mnt  opt  proc  root  run  sbin  srv  sys  tmp  usr  var  volume01  volume02
[root@VM-0-5-centos ~]# docker inspect 5fba373aa532
......
        "Mounts": [
            {
                "Type": "volume",
                "Name": "ea053221628118cb291e160a0d9c045c593086eac1015810590d61f91fb58e09",
                "Source": "/var/lib/docker/volumes/ea053221628118cb291e160a0d9c045c593086eac1015810590d61f91fb58e09/_data",
                "Destination": "volume01",
                "Driver": "local",
                "Mode": "",
                "RW": true,
                "Propagation": ""
            },
            {
                "Type": "volume",
                "Name": "0cb130b25673485bc7d3994a41abcf3f42867ae6a5420addd1917fcb7a34f8f9",
                "Source": "/var/lib/docker/volumes/0cb130b25673485bc7d3994a41abcf3f42867ae6a5420addd1917fcb7a34f8f9/_data",
                "Destination": "volume02",
                "Driver": "local",
                "Mode": "",
                "RW": true,
                "Propagation": ""
            }
        ],
......封装在docker里的volume01和volume02已经自动挂载了,启动的时候没有 添加 -v 参数。
假如构建dockerFile的时候没有挂载卷,需要在启动容器的时候加入-v参数手动挂载
父子容器数据共享
如果用户需要在多个容器之间共享一些持续更新的数据,最简单的方式是使用父子容器数据共享。 父子容器对应的目录数据共享,各容器修改、添加数据等都是同步共享的。数据卷的生命周期一直持续到没有容器使用它为止。
命令:docker run xxx --volumes-from 父容器

# 启动dockerFile生成的镜像,取名centos01,是有自动挂载的volume01、volume02
[root@VM-0-5-centos ~]# docker run -it --name centos01 hhu_centos:1.0
[root@784e9fa7a162 /]# ls
bin  etc   lib    lost+found  mnt  proc  run   srv  tmp  var       volume02
dev  home  lib64  media       opt  root  sbin  sys  usr  volume01

# 启动dockerFile生成的镜像,取名centos02,从centos01同步,也是有自动挂载的volume01、volume02
[root@VM-0-5-centos ~]# [root@VM-0-5-centos ~]# docker run -it --volumes-from centos01 --name centos02  hhu_centos:1.0

[root@VM-0-5-centos ~]# docker attach centos01
[root@784e9fa7a162 /]# cd volume01/
# 在centos01的volume01目录下创建ttttest文件
[root@784e9fa7a162 volume01]# touch ttttest
[root@784e9fa7a162 volume01]# ls
ttttest

# Ctrl+P+Q退出centos01,进入centos02
[root@VM-0-5-centos ~]# docker attach centos02
[root@40cbfd2ea133 /]# cd volume01/
# 可以看到是同步过来的
[root@40cbfd2ea133 volume01]# ls
ttttest

[root@40cbfd2ea133 /]# [root@VM-0-5-centos ~]# docker ps
[root@VM-0-5-centos ~]# docker ps
CONTAINER ID   IMAGE            COMMAND                  CREATED         STATUS         PORTS     NAMES
41cdd3f95ef3   hhu_centos:1.0   "/bin/sh -c /bin/bash"   6 minutes ago   Up 6 minutes             centos03
40cbfd2ea133   hhu_centos:1.0   "/bin/sh -c /bin/bash"   30 hours ago    Up 30 hours              centos02
784e9fa7a162   hhu_centos:1.0   "/bin/sh -c /bin/bash"   30 hours ago    Up 30 hours              centos01

# 启动dockerFile生成的镜像,取名centos03,从centos01同步,也是有自动挂载的volume01、volume02,并且volume01中已经有centos01创建的文件了
[root@VM-0-5-centos ~]# docker run -it --volumes-from centos01 --name centos03 hhu_centos:1.0
[root@41cdd3f95ef3 /]# cd volume01/
[root@41cdd3f95ef3 volume01]# ls
ttttest

# 删掉centos01
[root@VM-0-5-centos ~]# docker kill 784e9fa7a162
784e9fa7a162
[root@VM-0-5-centos ~]# docker rm 784e9fa7a162
784e9fa7a162

[root@VM-0-5-centos ~]# docker ps -a
CONTAINER ID   IMAGE            COMMAND                  CREATED          STATUS          PORTS     NAMES
41cdd3f95ef3   hhu_centos:1.0   "/bin/sh -c /bin/bash"   13 minutes ago   Up 13 minutes             centos03
40cbfd2ea133   hhu_centos:1.0   "/bin/sh -c /bin/bash"   30 hours ago     Up 30 hours               centos02
# 进入centos03创建文件,看centos02是否会有同步
[root@VM-0-5-centos ~]# docker attach centos03
[root@41cdd3f95ef3 volume01]# touch test
[root@41cdd3f95ef3 volume01]# ls
test  ttttest

# Ctrl+P+Q退出centos03,进入centos02,看也有centos03创建的文件
[root@VM-0-5-centos ~]# docker attach centos02
[root@40cbfd2ea133 volume01]# ls
test  ttttest

# 查看centos02和centos03,发现他们挂载的都是同一个路径
[root@VM-0-5-centos ~]# docker inspect centos02
......
        "Mounts": [
            {
                "Type": "volume",
                "Name": "c7c43116b57172e865ae6c648ae9f7be59e4aab2a6bf2eb62b85712c1ab4118f",
                "Source": "/var/lib/docker/volumes/c7c43116b57172e865ae6c648ae9f7be59e4aab2a6bf2eb62b85712c1ab4118f/_data",
                "Destination": "volume02",
                "Driver": "local",
                "Mode": "",
                "RW": true,
                "Propagation": ""
            },
            {
                "Type": "volume",
                "Name": "7b26b93df60335e29d880bd7c5bafe5a93bed42228b3175c6667317081f690fc",
                "Source": "/var/lib/docker/volumes/7b26b93df60335e29d880bd7c5bafe5a93bed42228b3175c6667317081f690fc/_data",
                "Destination": "volume01",
                "Driver": "local",
                "Mode": "",
                "RW": true,
                "Propagation": ""
            }
        ],
......
DockerFile
DockerFile介绍
DockerFile是用来构建docker镜像的文件,命令参数脚本。
构建步骤:
- 编写一个dockerfile文件
- docker build构建成一个镜像
- docker run 运行镜像
- docker push 发布镜像(DockerHub,阿里云镜像仓库)
DockerHub中CentOS的DockerFile文件
FROM scratch
MAINTAINER The CentOS Project <cloud-ops@centos.org>
ADD c7-docker.tar.xz /
LABEL name="CentOS Base Image" \
    vendor="CentOS" \
    license="GPLv2" \
    build-date="2016-03-04"

# Volumes for systemd
# VOLUME ["/run", "/tmp"]

# Environment for systemd
# ENV container=docker

# For systemd usage this changes to /usr/sbin/init
# Keeping it as /bin/bash for compatability with previous
CMD ["/bin/bash"]
DockerFIle构建过程
- 保留关键字必须大写
- 执行顺序从上到下
- # 为注释
- 每一个指定都会往上创建提交一个新的镜像层,并提交
DockerFile指令详解
FROM <image>:<digest>指定基础镜像,并且必须是第一条指令,digest参数可选如果不以任何镜像为基础,那么写法为:FROM scratch。同时意味着接下来所写的指令将作为镜像的第一层开始
LABEL标签LABEL <key1>=<value1> <key2>=<value2> <key3>=<value3>LABEL “com.example.vendor”=”ACME Incorporated”
LABEL com.example.label-with-value=”foo”
LABEL version=”1.0”如太长需要换行的话则使用\符号
LABEL description=”This text illustrates
that label-values can span multiple lines.”说明:LABEL会继承基础镜像种的LABEL,如遇到key相同,则值覆盖
ADD ["<src>",... "<dest>"]复制命令,把文件复制到镜像中- 路径的填写可以是容器内的绝对路径,也可以是相对于工作目录的相对路径,推荐写成绝对路径
- 可以是一个本地文件或者是一个本地压缩文件,还可以是一个url
- 如果把写成一个url,那么ADD就类似于wget命令
注意事项
- src为一个目录的时候,会自动把目录下的文件复制过去,目录本身不会复制
- 如果src为多个文件,dest一定要是一个目录
COPY ["<src>",... "<dest>"]COPY的只能是本地文件,其他用法一致EXPOSE <port>/<tcp/udp>功能为暴漏容器运行时的监听端口给外部,但是EXPOSE并不会使容器访问主机的端口。如果想使得容器与主机的端口有映射关系,必须在容器启动的时候加上 -p 参数ENV一次设置多个ENV
一次设置一个 ENV
= … 一次设置多个 在Dockerfile中使用变量的方式
- $varname
- ${varname}
- ${varname:-default value} 当变量不存在使用-号后面的值
- $(varname:+default value} 当变量存在时使用+号后面的值(当然不存在也是使用后面的值)
RUN运行指定的命令,有两种格式RUN
在linux操作系统上默认 /bin/sh -c;在windows操作系统上默认 cmd /S /C RUN [“executable”, “param1”, “param2”] 可将executable理解成为可执行文件,后面就是两个参数。
换行使用\,多行命令不要写多个RUN,原因是Dockerfile中每一个指令都会建立一层。多少个RUN就构建了多少层镜像,会造成镜像的臃肿、多层,不仅仅增加了构件部署的时间,还容易出错。
CMD容器启动时默认命令或参数,语法有三种写法第一种就是shell这种执行方式和写法
CMD command param1 param2第二种是可执行文件加上参数的形式(推荐)
CMD [“executable”,”param1”,”param2”]该写法是为 ENTRYPOINT 指令指定的程序提供默认参数
CMD [““,” “,…] 举例说明两种写法:
CMD [ "sh", "-c", "echo $HOME"
CMD [ "echo", "$HOME" ]
这里边包括参数的一定要用双引号,就是”,不能是单引号。千万不能写成单引号。原因是参数传递后,docker解析的是一个JSON array
不要把RUN和CMD搞混了
RUN是构件容器时就运行的命令以及提交运行结果
CMD是容器启动时执行的命令,在构件时并不运行,构件时紧紧指定了这个命令到底是个什么样子
ENTRYPOINT容器启动时运行得启动命令ENTRYPOINT command param1 param2 可执行文件加参数(EXEC调用,可在docker run启动时传递参数) ENTRYPOINT ["executable", "param1", "param2"] 写shell (shell执行)CMD比较说明(这俩命令太像了,而且还可以配合使用):
相同点:
- 只能写一条,如果写了多条,那么只有最后一条生效
- 容器启动时才运行,运行时机相同
不同点:
- ENTRYPOINT不会被运行的command覆盖,而CMD则会被覆盖
- 如果我们在Dockerfile种同时写了ENTRYPOINT和CMD,并且CMD指令不是一个完整的可执行命令,那么CMD指定的内容将会作为ENTRYPOINT的参数
VOLUME ["/data"]挂载功能,可以将宿主机目录挂载到容器中USER设置启动容器的用户,可以是用户名或UIDUSER daemo USER UID注意:
如果设置了容器以daemon用户去运行,那么RUN, CMD 和 ENTRYPOINT 都会以这个用户去运行,
使用这个命令一定要确认容器中拥有这个用户,并且拥有足够权限WORKDIR /path/to/workdir设置工作目录,对RUN,CMD,ENTRYPOINT,COPY,ADD生效。如果不存在则会创建,也可以设置多次。WORKDIR /a WORKDIR b WORKDIR c RUN pwdpwd执行的结果是/a/b/c
WORKDIR也可以解析环境变量,如:
ENV DIRPATH /path
WORKDIR $DIRPATH/$DIRNAME
RUN pwd
pwd的执行结果是/path/$DIRNAME
ARG <name>[=<default value>]设置变量命令设置变量命令,ARG命令定义了一个变量,在docker build创建镜像的时候,使用 –build-arg = 来指定参数
如果用户在build镜像时指定了一个参数没有定义在Dockerfile中,那么将有一个Warning:
[Warning] One or more build-args [foo] were not consumed.我们可以定义一个或多个参数,如下:
FROM busybox
ARG user1
ARG buildno
也可以给参数一个默认值,当build镜像时没有指定参数值,将会使用这个默认值
FROM busybox
ARG user1=someuser
ARG buildno=1
STOPSIGNAL signal当容器停止时给系统发送什么样的指令,默认是15HEALTHCHECK容器健康状况检查命令HEALTHCHECK [OPTIONS] CMD command 容器内部运行一个命令来检查容器的健康状况 HEALTHCHECK NONE 基础镜像中取消健康检查命令[OPTIONS]的选项支持以下三中选项:
–interval=DURATION 两次检查默认的时间间隔为30秒
–timeout=DURATION 健康检查命令运行超时时长,默认30秒
–retries=N 当连续失败指定次数后,则容器被认为是不健康的,状态为unhealthy,默认次数是3
注意:
HEALTHCHECK命令只能出现一次,如果出现了多次,只有最后一个生效。
CMD后边的命令的返回值决定了本次健康检查是否成功,具体的返回值如下:
0: success - 表示容器是健康的
1: unhealthy - 表示容器已经不能工作了
2: reserved - 保留值
举个例子:
HEALTHCHECK --interval=5m --timeout=3s \
CMD curl -f http://localhost/ || exit 1
健康检查命令是:curl -f http://localhost/ || exit 1
两次检查的间隔时间是5秒
命令超时时间为3秒
实战之构建自己的CentOS镜像
基础镜像:centos,拓展vim命令、ifconfig命令、设置工作路径为 /usr/local,对外开放80端口
Tag标签测试
tag行标签
我是测试文本
tag行内标签
我是一段文字,我是行内标签,好看吧!!
测试组图